How to build a CI/CD pipeline for Serverless apps with Travis CI
In one of our previous posts we looked at how to build a CI/CD pipeline for Serverless apps on AWS with CircleCI. Today, we’ll look at how to do the same with Travis CI.
The purpose of these posts is to dive deep into real-world CI/CD setups, something which most of the tutorials out there skip. We’ll try to illustrate how to set up something similar to Seed but using Travis CI instead. It’ll also give a you chance to see how Seed makes your life easier!
To cover a real-world setup we’ll be using a:
- A monorepo Serverless app
- With multiple services
- Deployed to separate development and production AWS accounts
As a refresher, a monorepo Serverless app is one where multiple Serverless services are in subdirectories with their own serverless.yml file. Here is a sample repo for the app that we’ll be configuring. The directory structure might look something like this:
/
  package.json
  services/
    users-api/
      package.json
      serverless.yml
    posts-api/
      package.json
      serverless.yml
    cron-job/
      package.json
      serverless.yml
What we’ll be covering
- How to deploy your monorepo Serverless app on Git push
- How to deploy to multiple AWS accounts
- How to deploy using the pull request workflow
- How to clean up unused branches and closed pull requests
Note that, this guide is structured to work in standalone steps. If you only want to deploy to multiple AWS accounts, you can stop after step 2.
Pre-requisites
- A Travis CI account.
- AWS credentials (Access Key Id and Secret Access Key) of the AWS account you are going to deploy to. Follow this guide to create one.
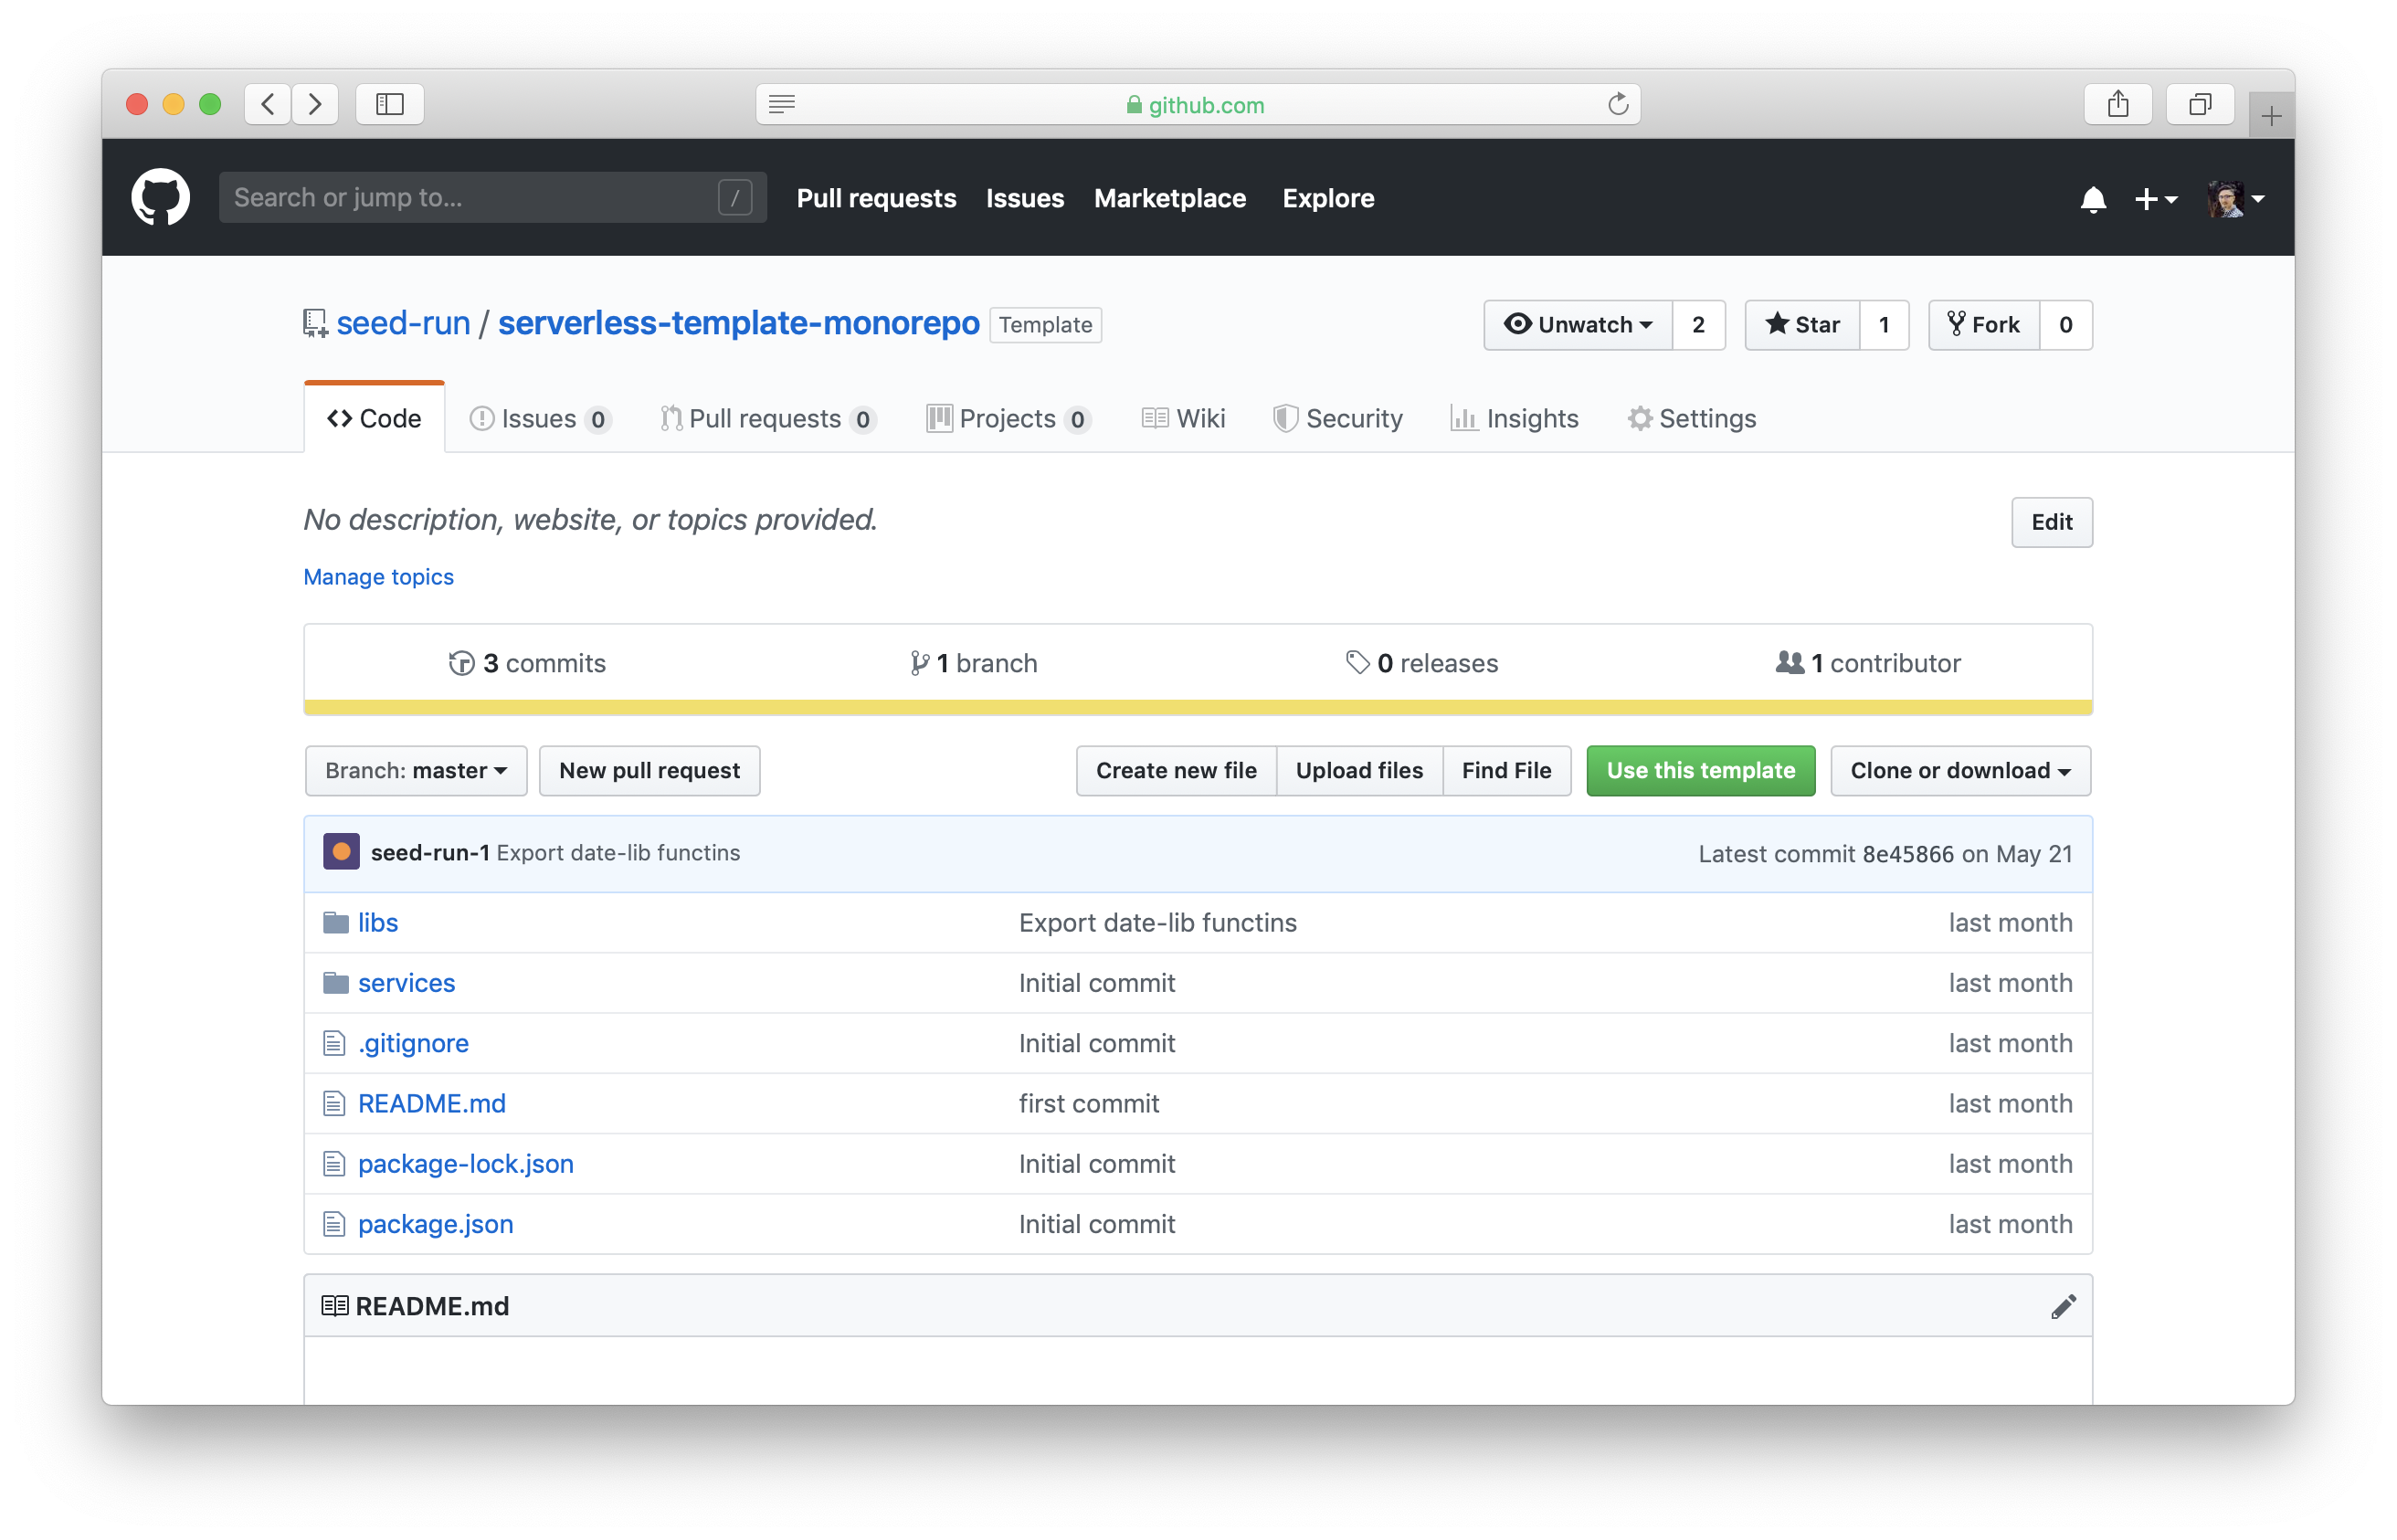
- A monorepo Serverless app in a GitHub repo. Head over to our template repo and click on Use this template to clone it to your account.
1. How to deploy your monorepo app on Git push
Let’s start by configuring the Travis side of things.
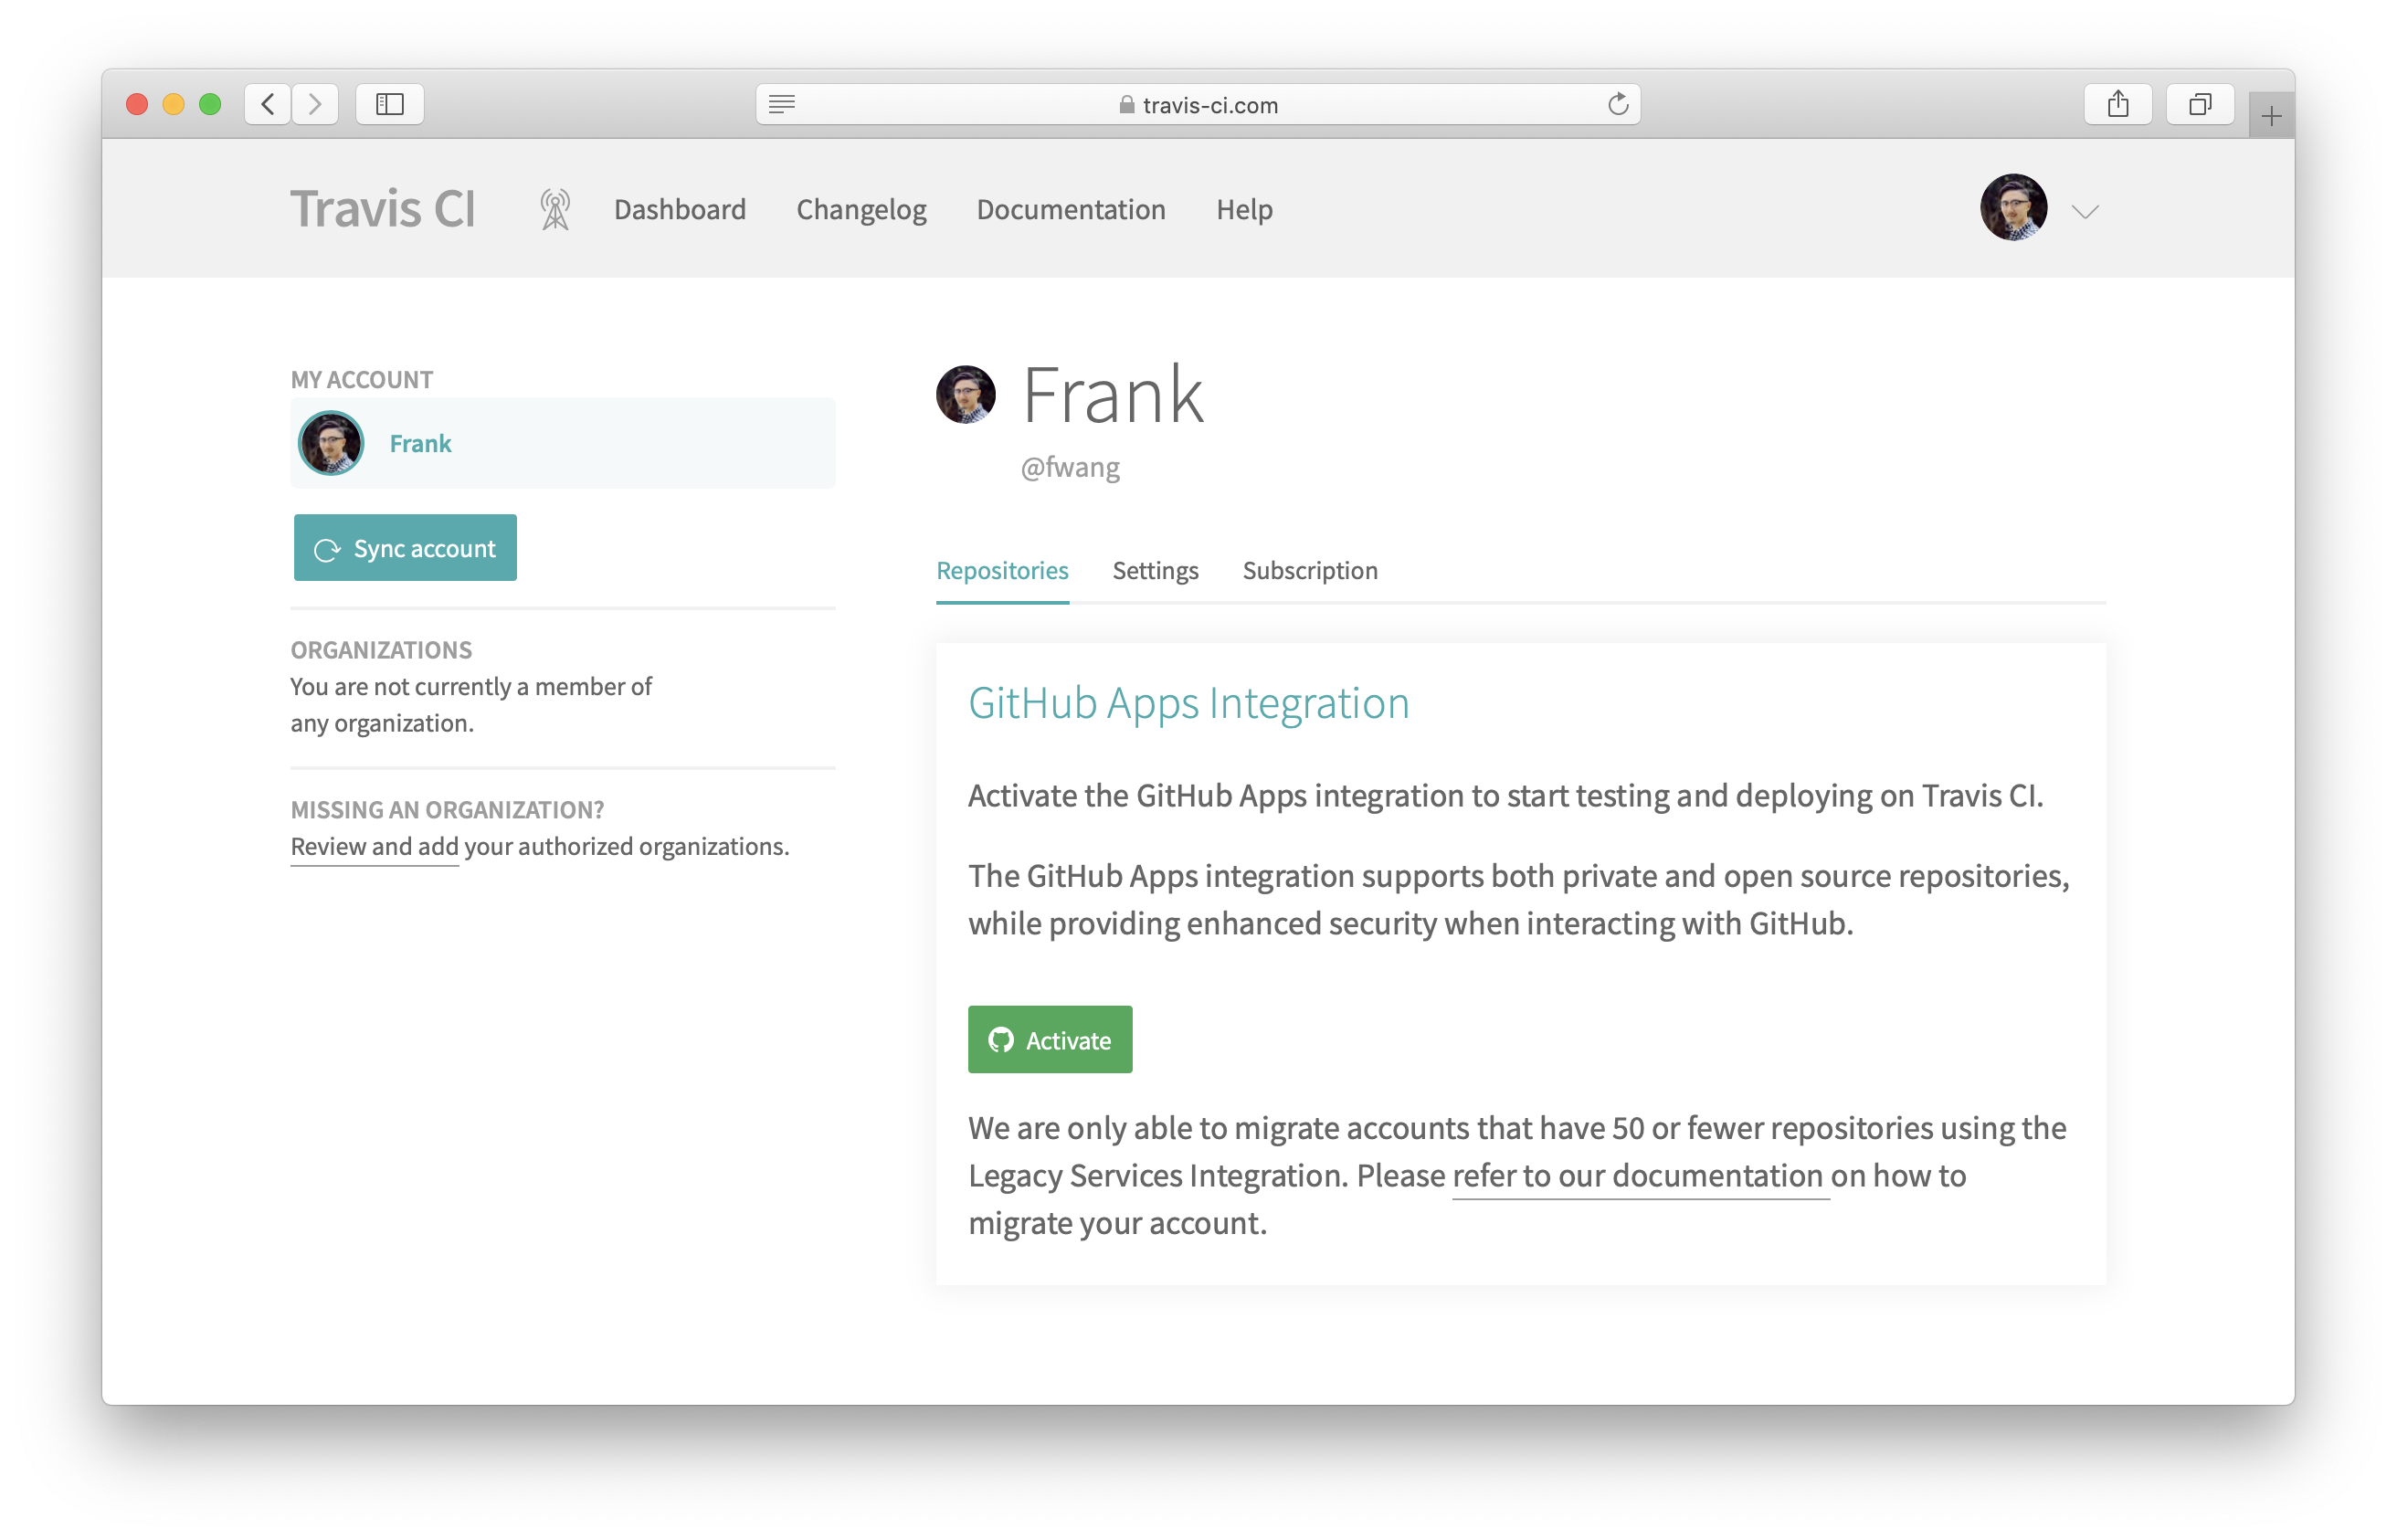
Go into your Travis CI account. Head over to your profile and click Activate.
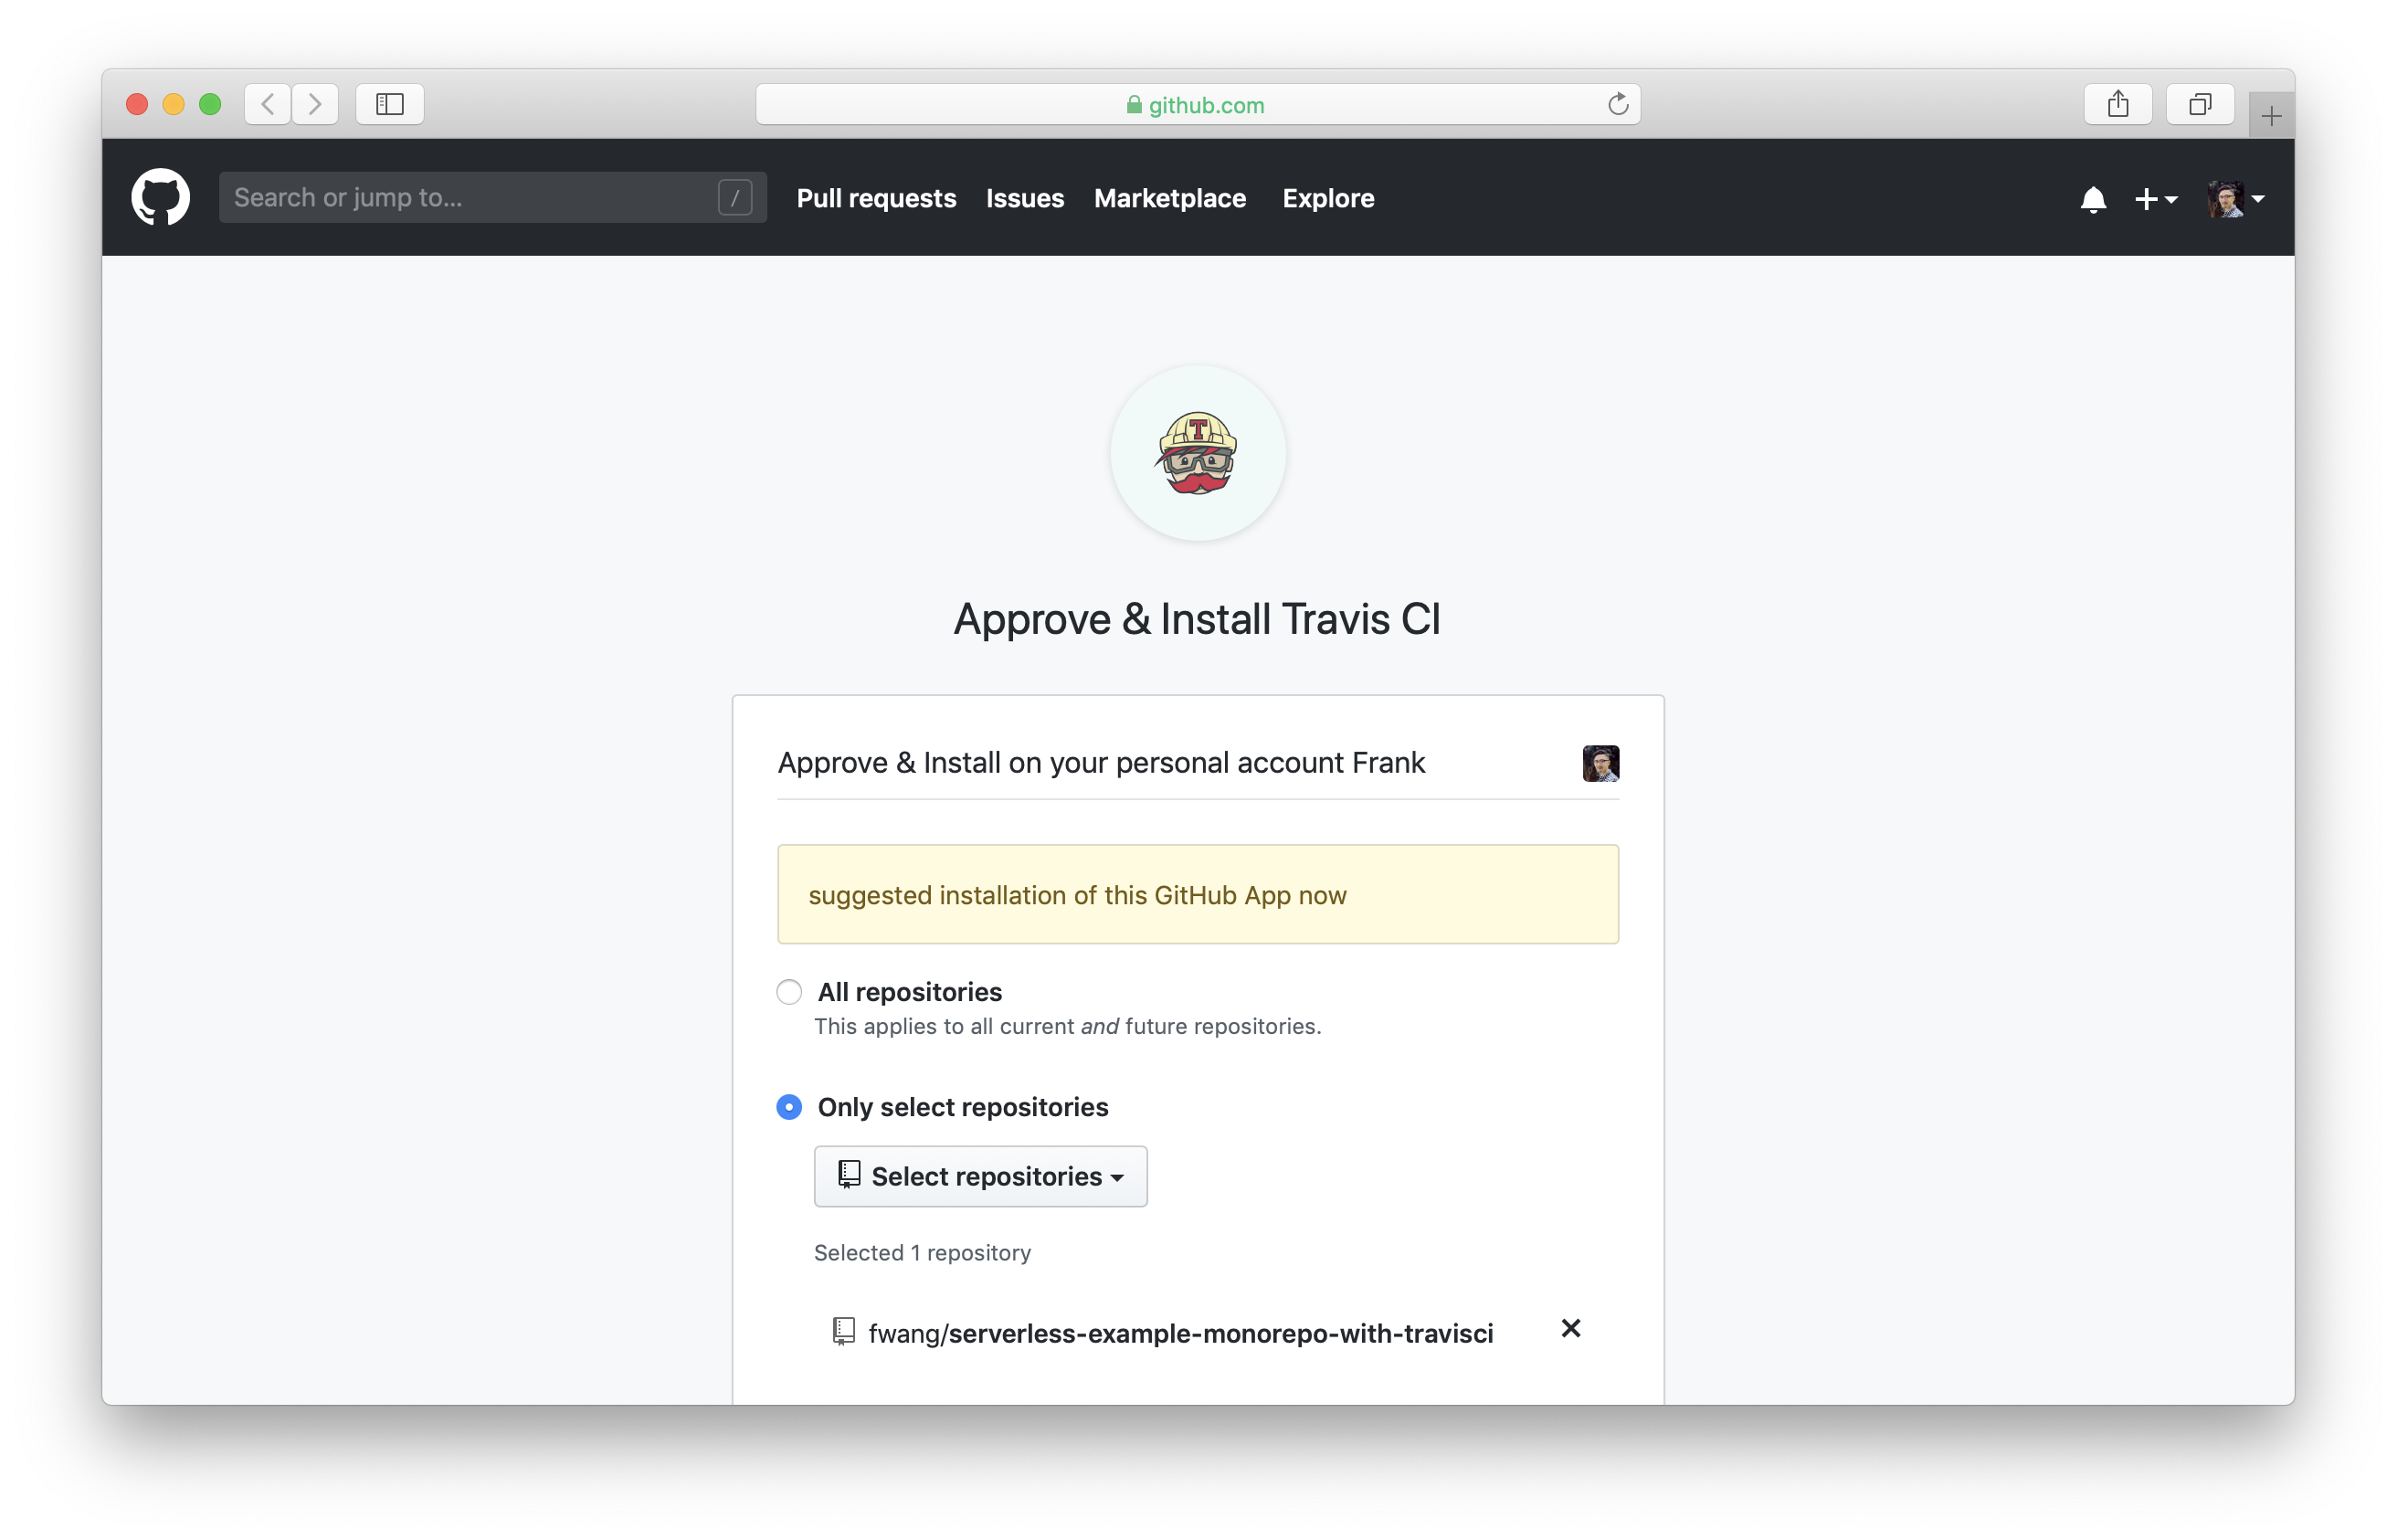
Select the repository you want to build on Travis, and select Approve & Install.
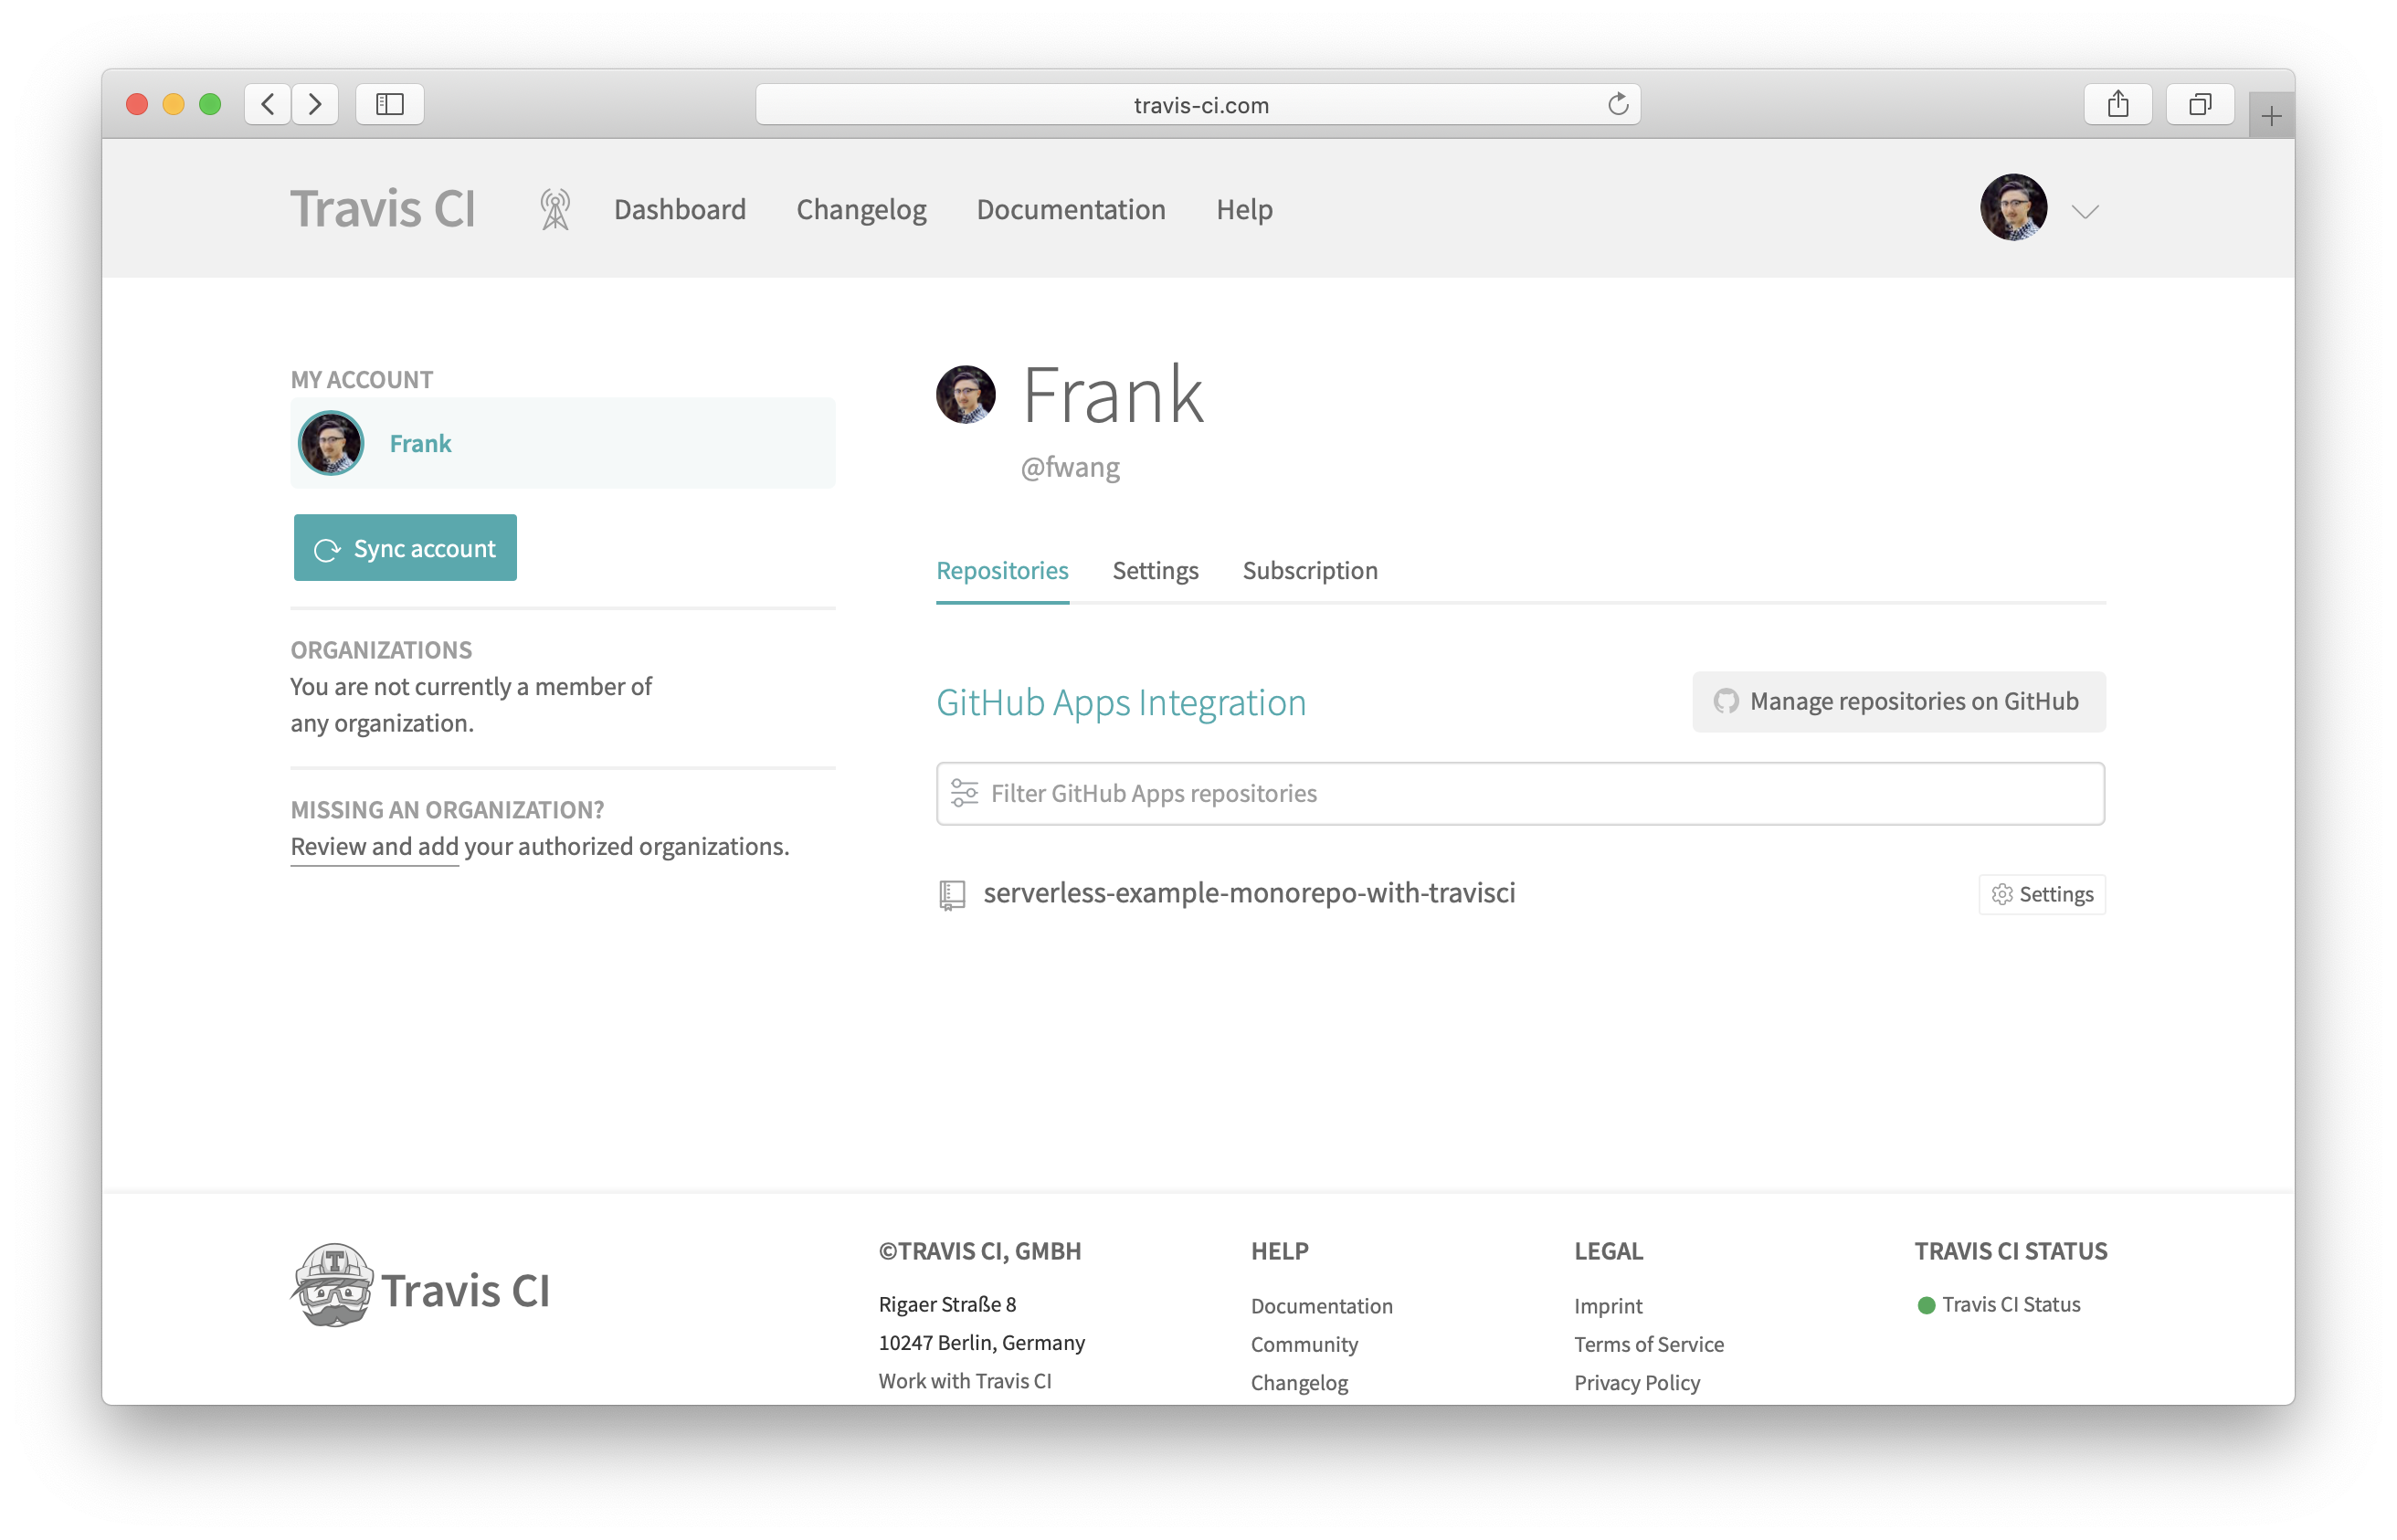
Click on Settings for the repository you just added.
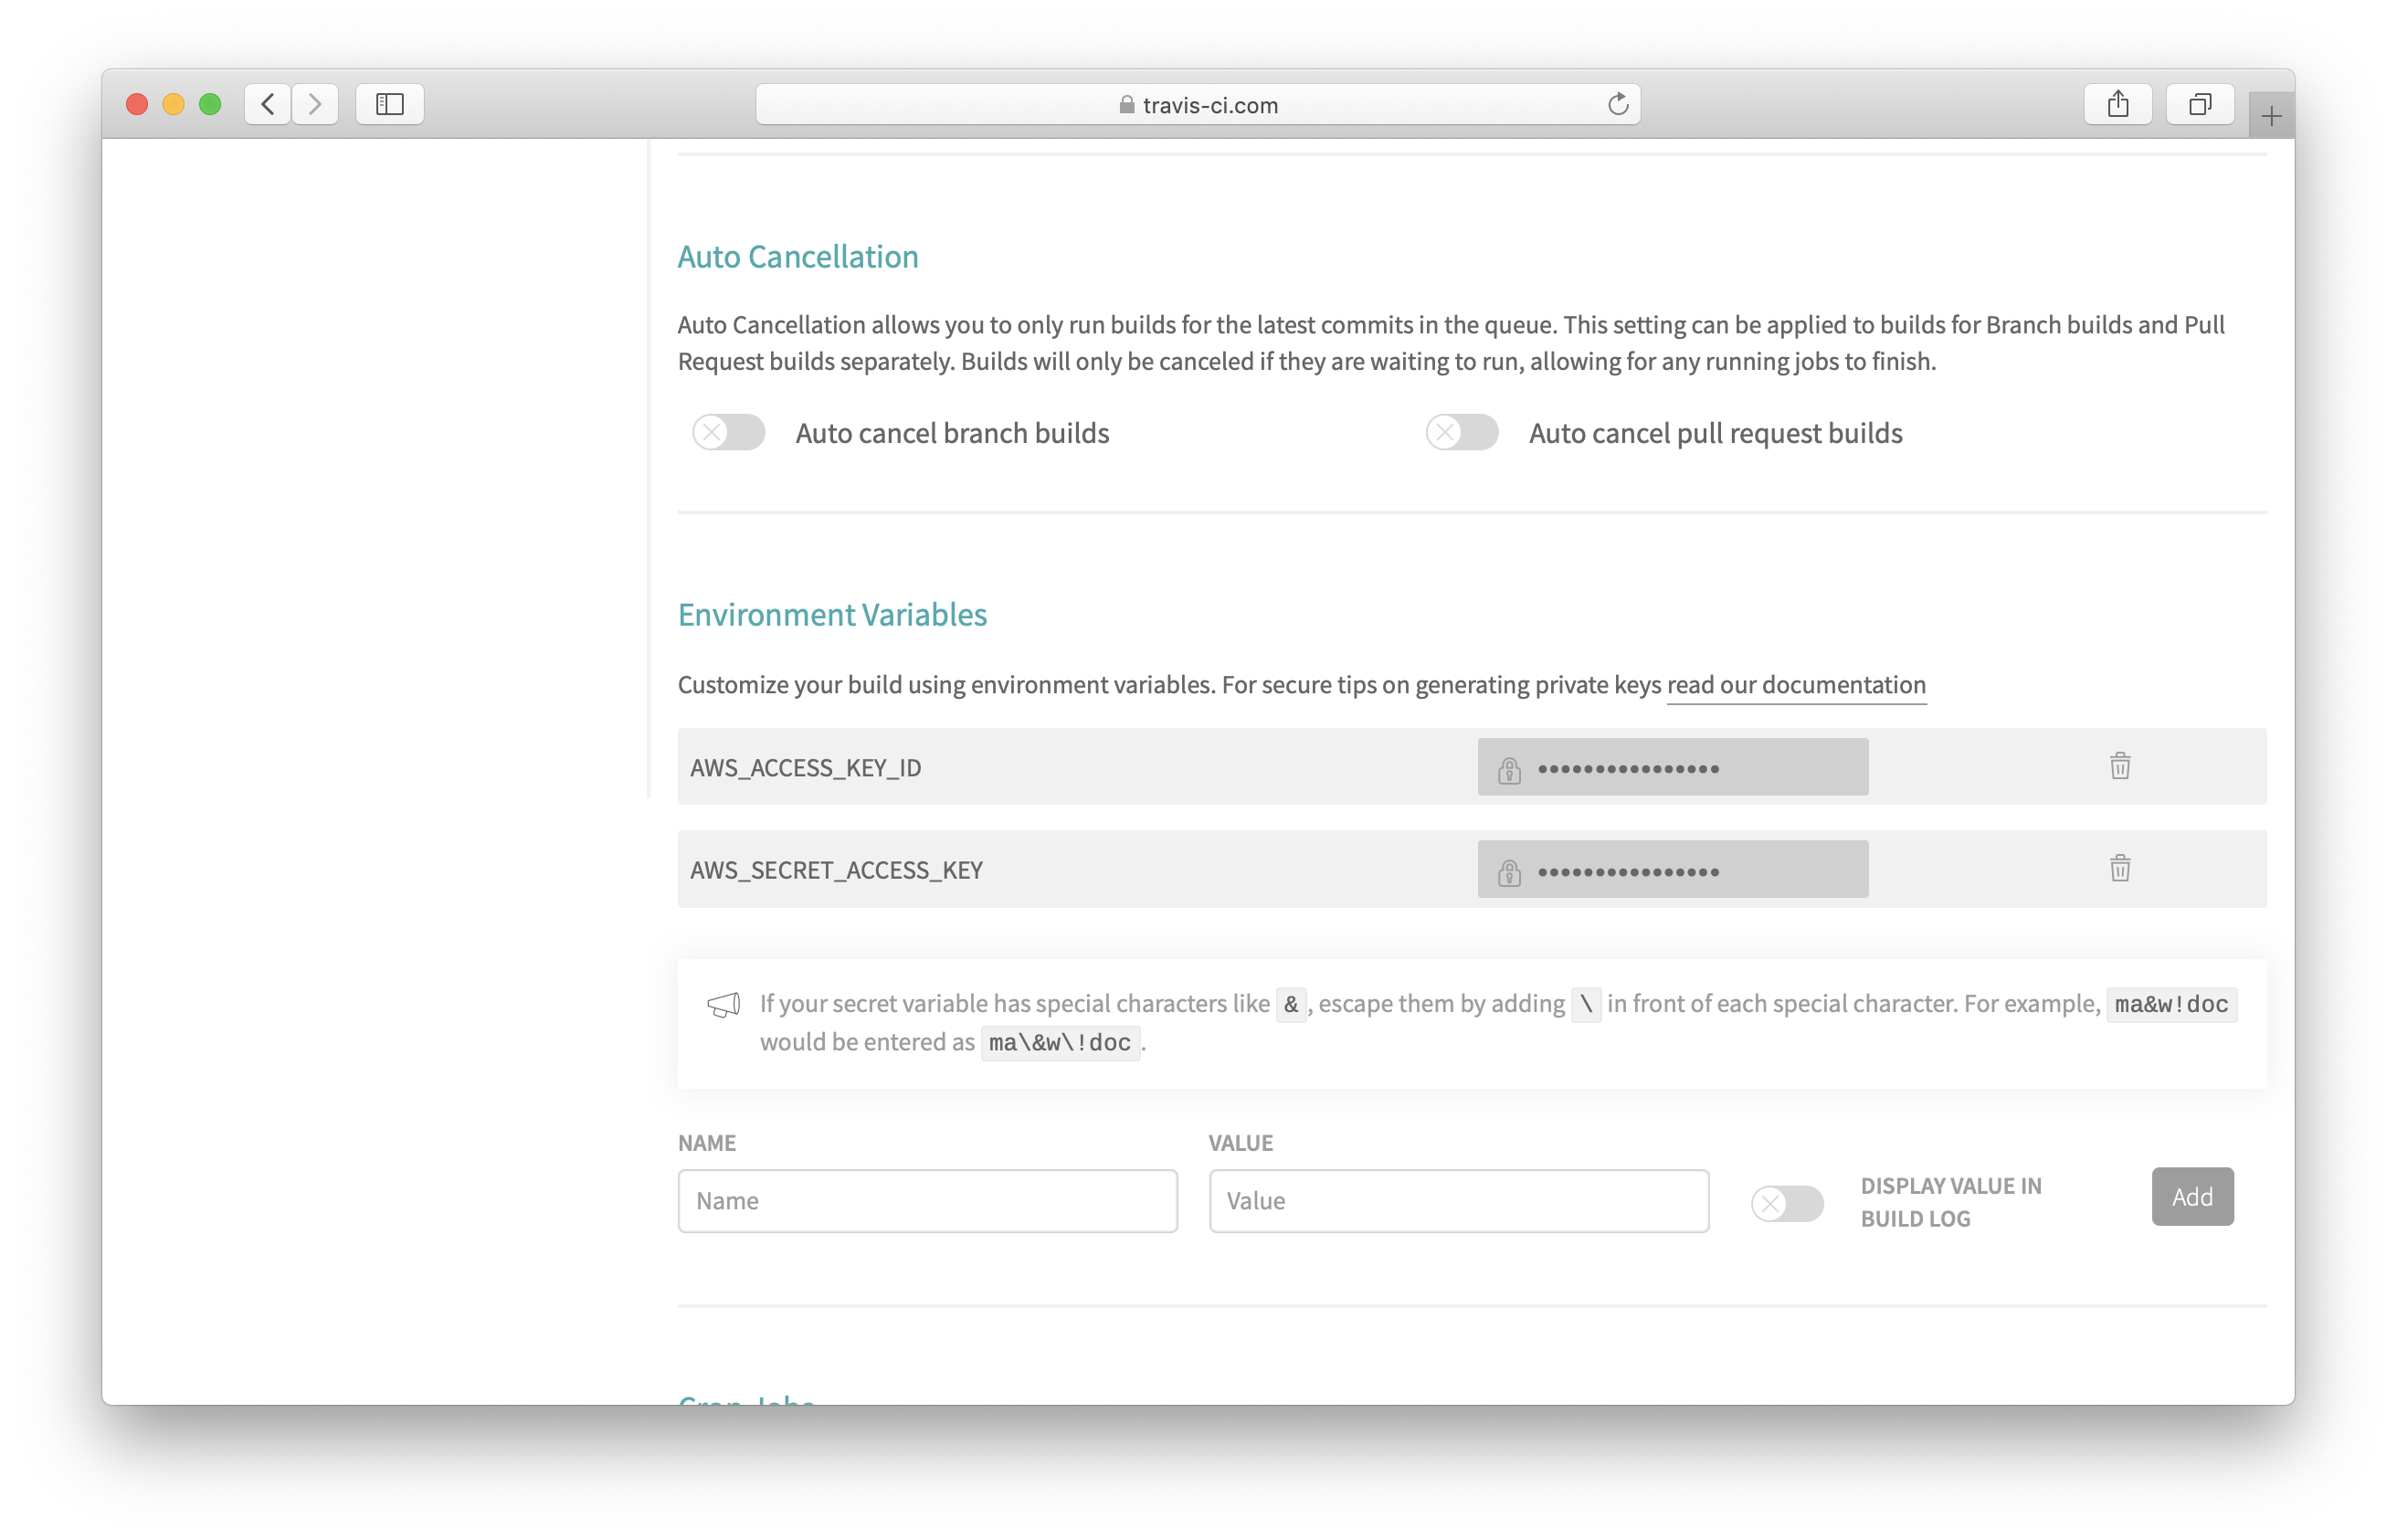
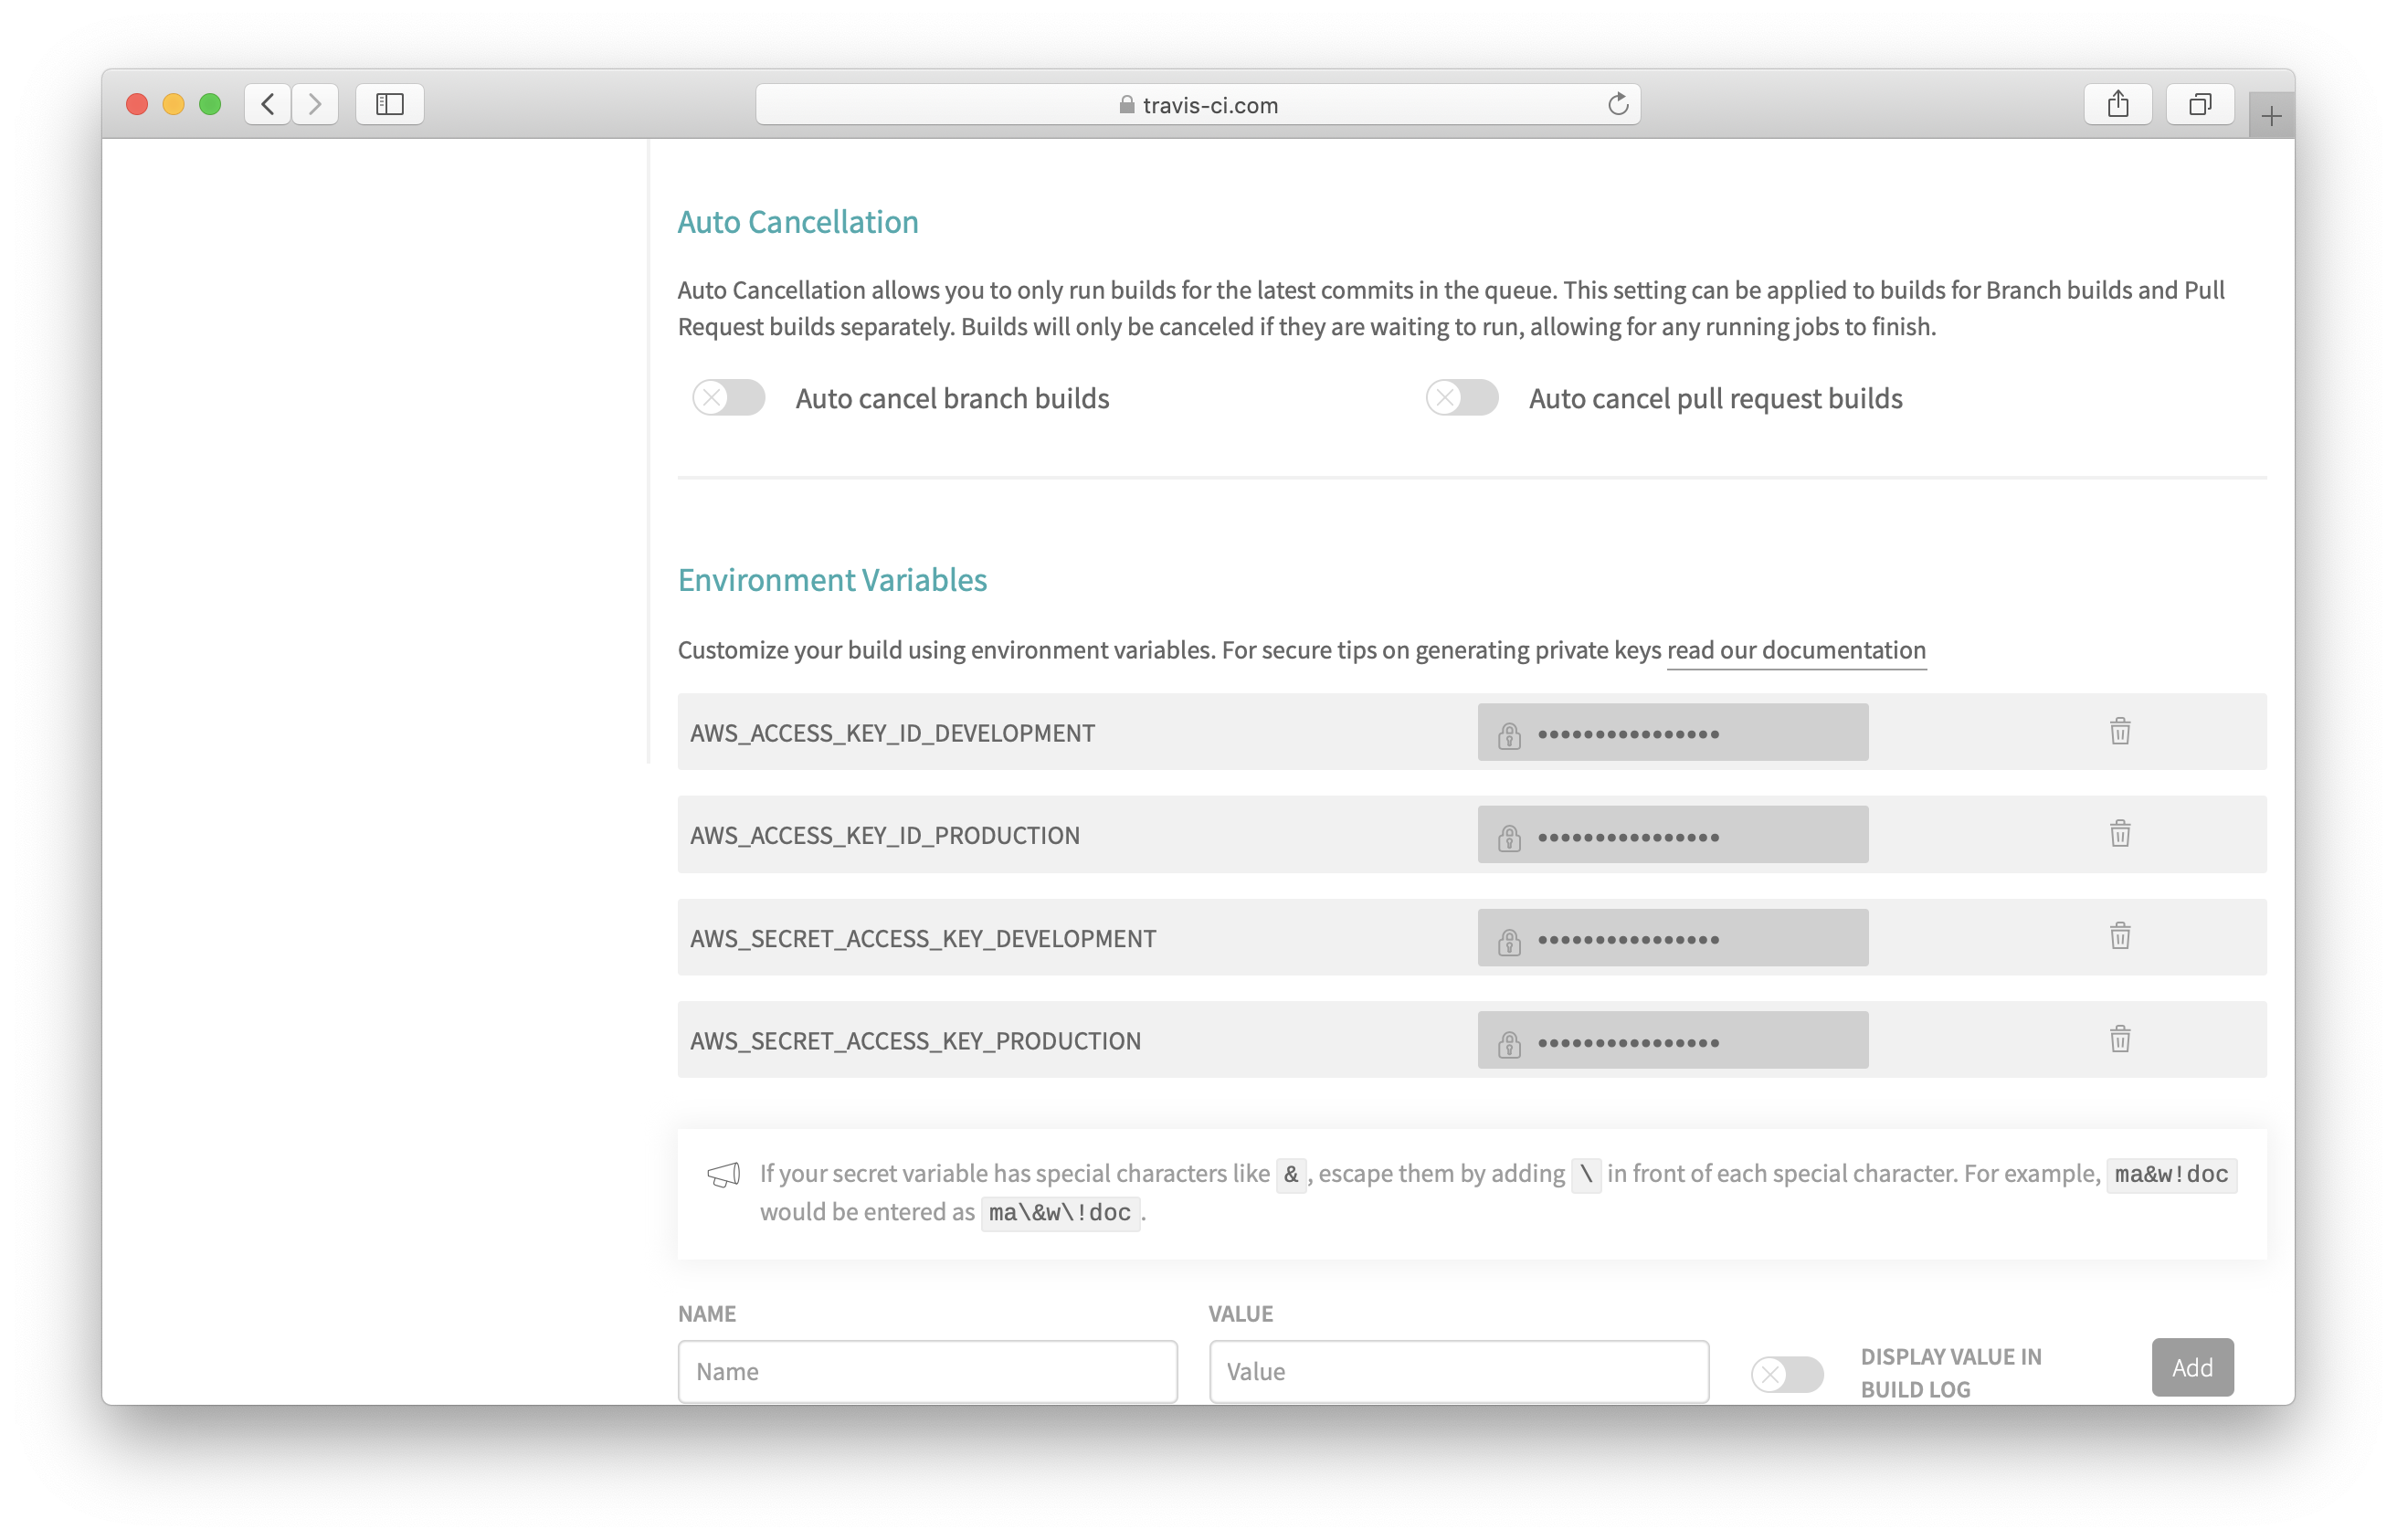
Scroll down to the Environment Variables section, and add a variable with:
- Name: AWS_ACCESS_KEY_ID
- Value: Access Key Id of the IAM user
Repeat the previous step and create another variable with:
- Name: AWS_SECRET_ACCESS_KEY
- Value: Secret Access Key of the IAM user
Go to the cloned repository and click on Create new file.
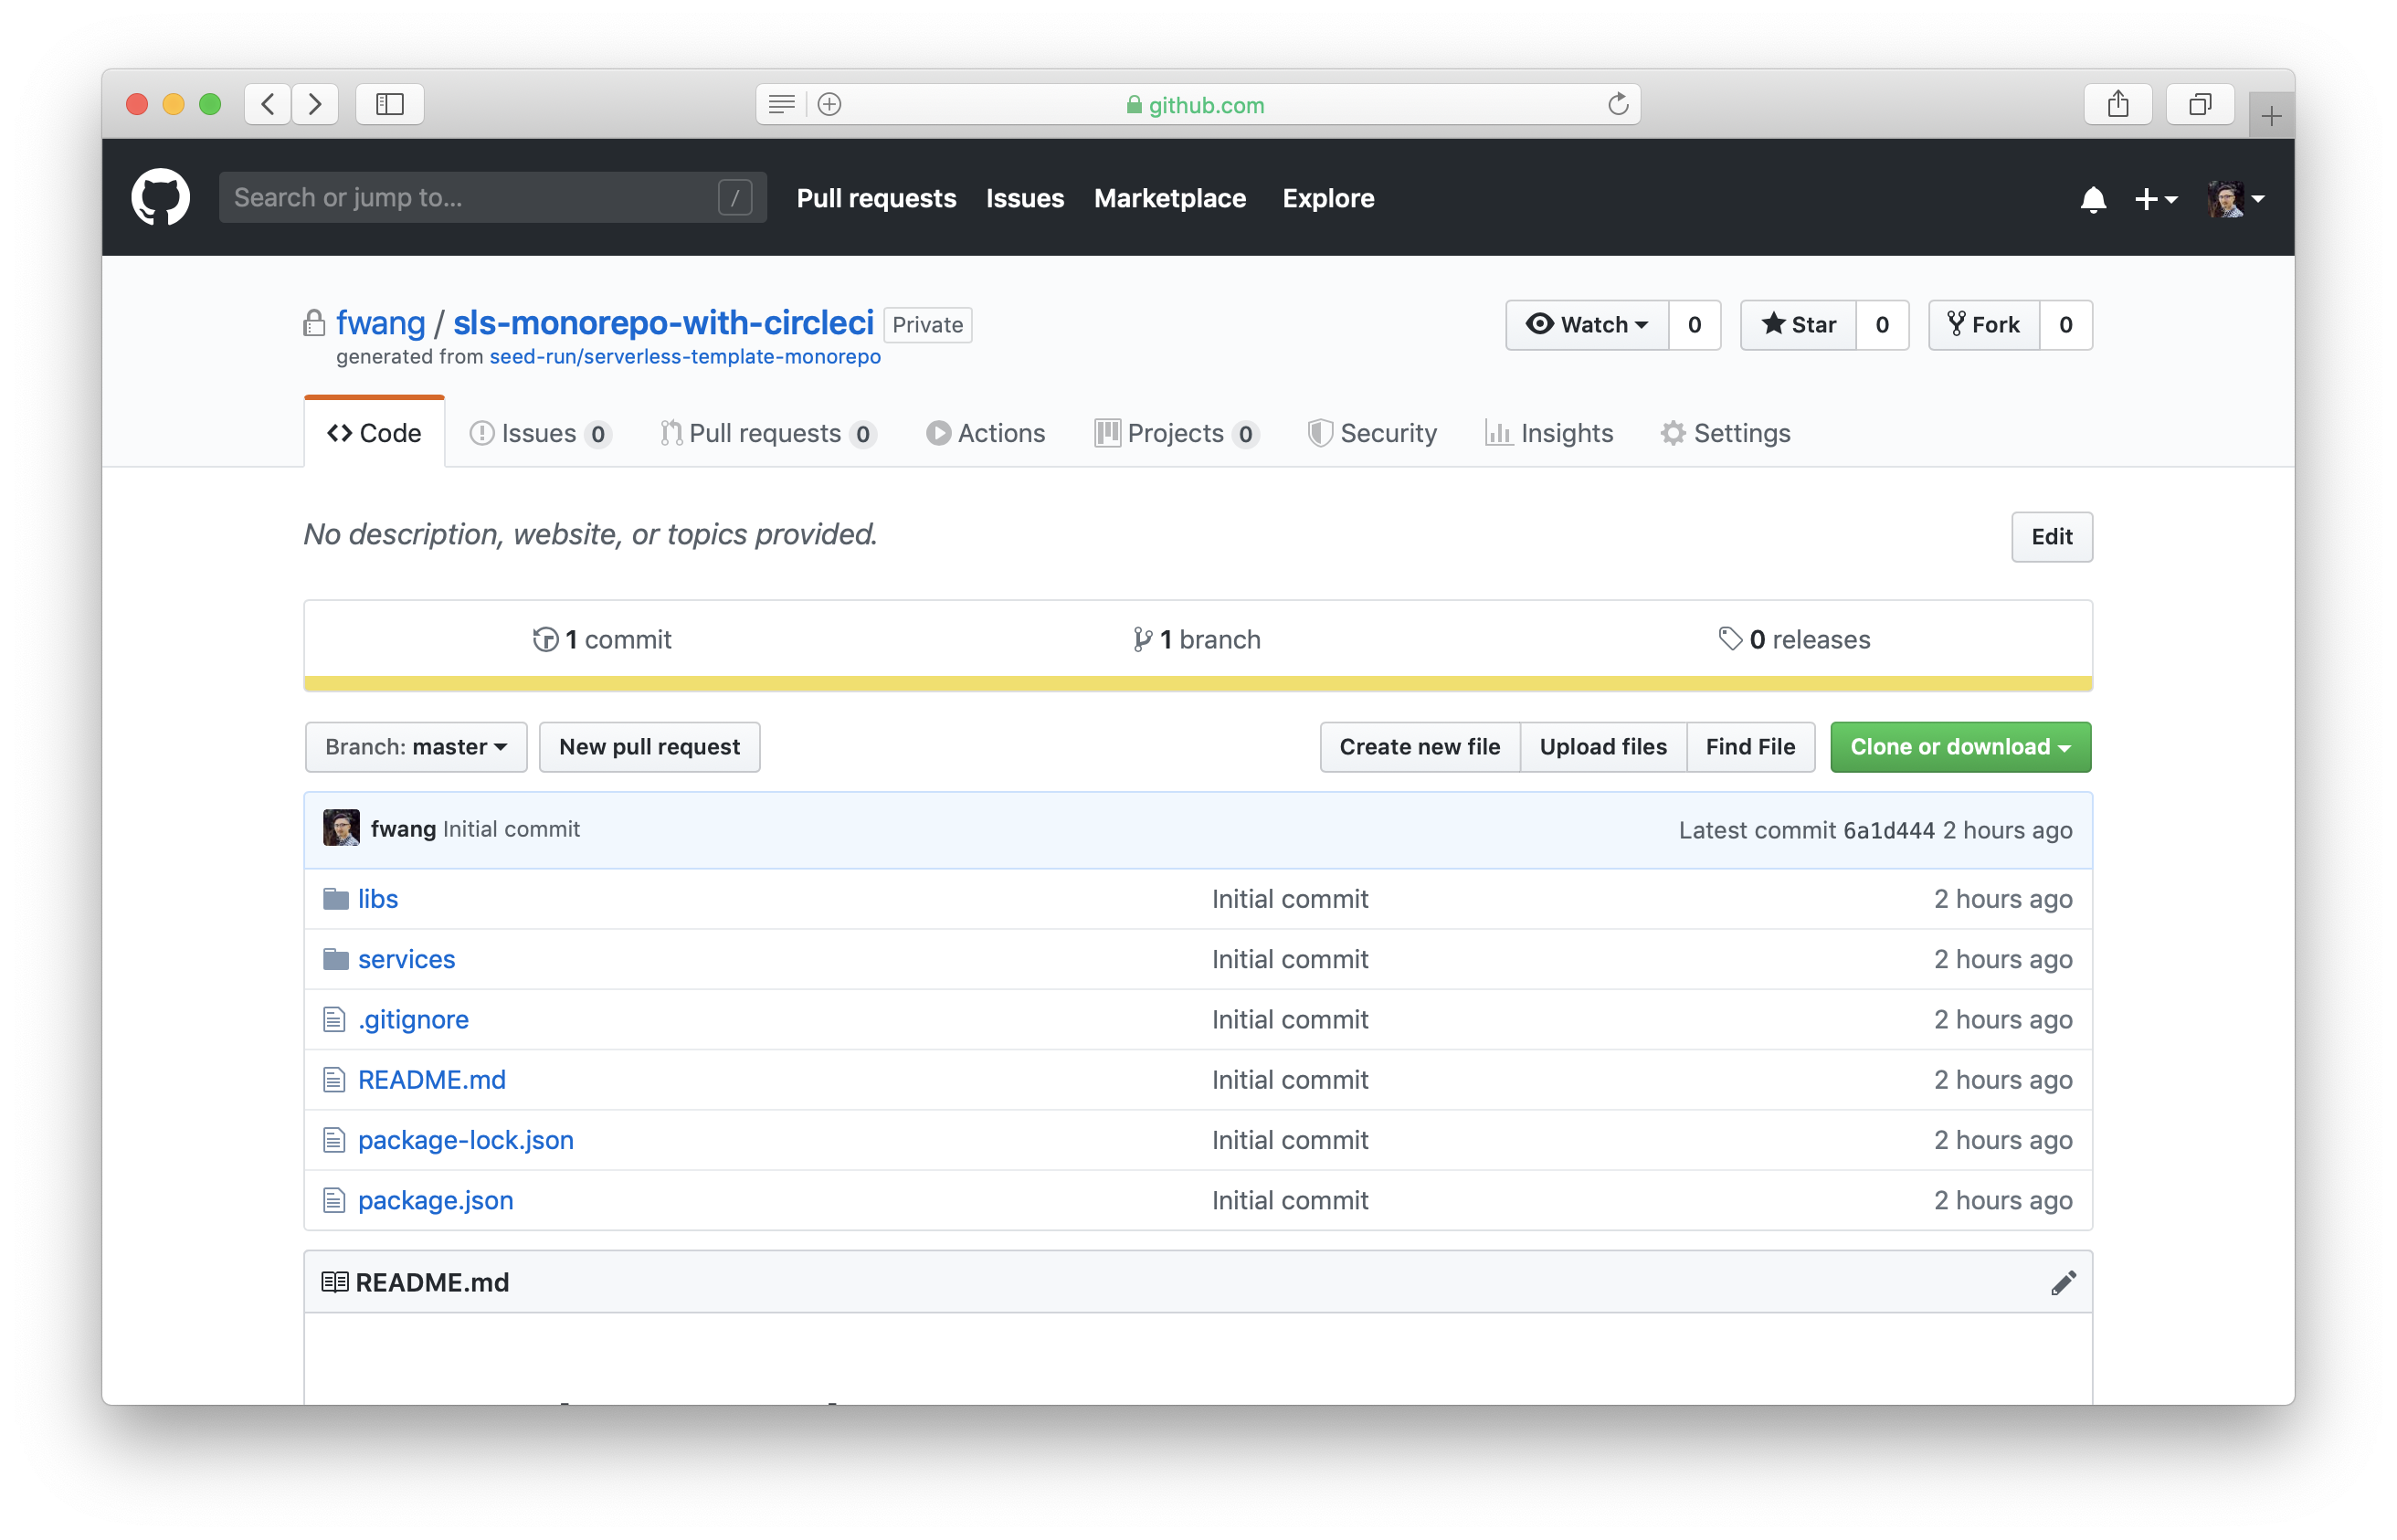
Name the new file .travis.yml and paste the following:
language: node_js
node_js:
  - "8.10"

deploy_service_job: &DEPLOY_SERVICE_JOB
  cache:
    directories:
      - node_modules
      - ${SERVICE_PATH}/node_modules

  install:
    - npm install -g serverless
    - travis_retry npm install
    - cd ${SERVICE_PATH}
    - travis_retry npm install
    - cd -

  script:
    - cd ${SERVICE_PATH}
    - serverless deploy -s ${TRAVIS_BRANCH}
    - cd -

jobs:
  include:
    - <<: *DEPLOY_SERVICE_JOB
      name: "Deploy Users API"
      env:
        - SERVICE_PATH="services/users-api"
    - <<: *DEPLOY_SERVICE_JOB
      name: "Deploy Posts API"
      env:
        - SERVICE_PATH="services/posts-api"
    - <<: *DEPLOY_SERVICE_JOB
      name: "Deploy Cron Job"
      env:
        - SERVICE_PATH="services/cron-job"
Let’s quickly go over what we are doing here:
- We created a job template called deploy_service_job, that takes the path of a service.
- The deploy_service_job job does an
npm installin the repo’s root directory and in the service subdirectory. - The job then goes into the service directory and runs
serverless deployusing the branch name as the stage name. - We then defined 3 jobs that runs the deploy_service_job for each service, while passing in the path of the service.
- As a side note, we also specified that we want to cache the
node_modules/directory in both the root and the service directory for faster deployment.
Next, scroll to the bottom and click Commit new file.
Back in Travis, you will see the 3 jobs that are currently running.
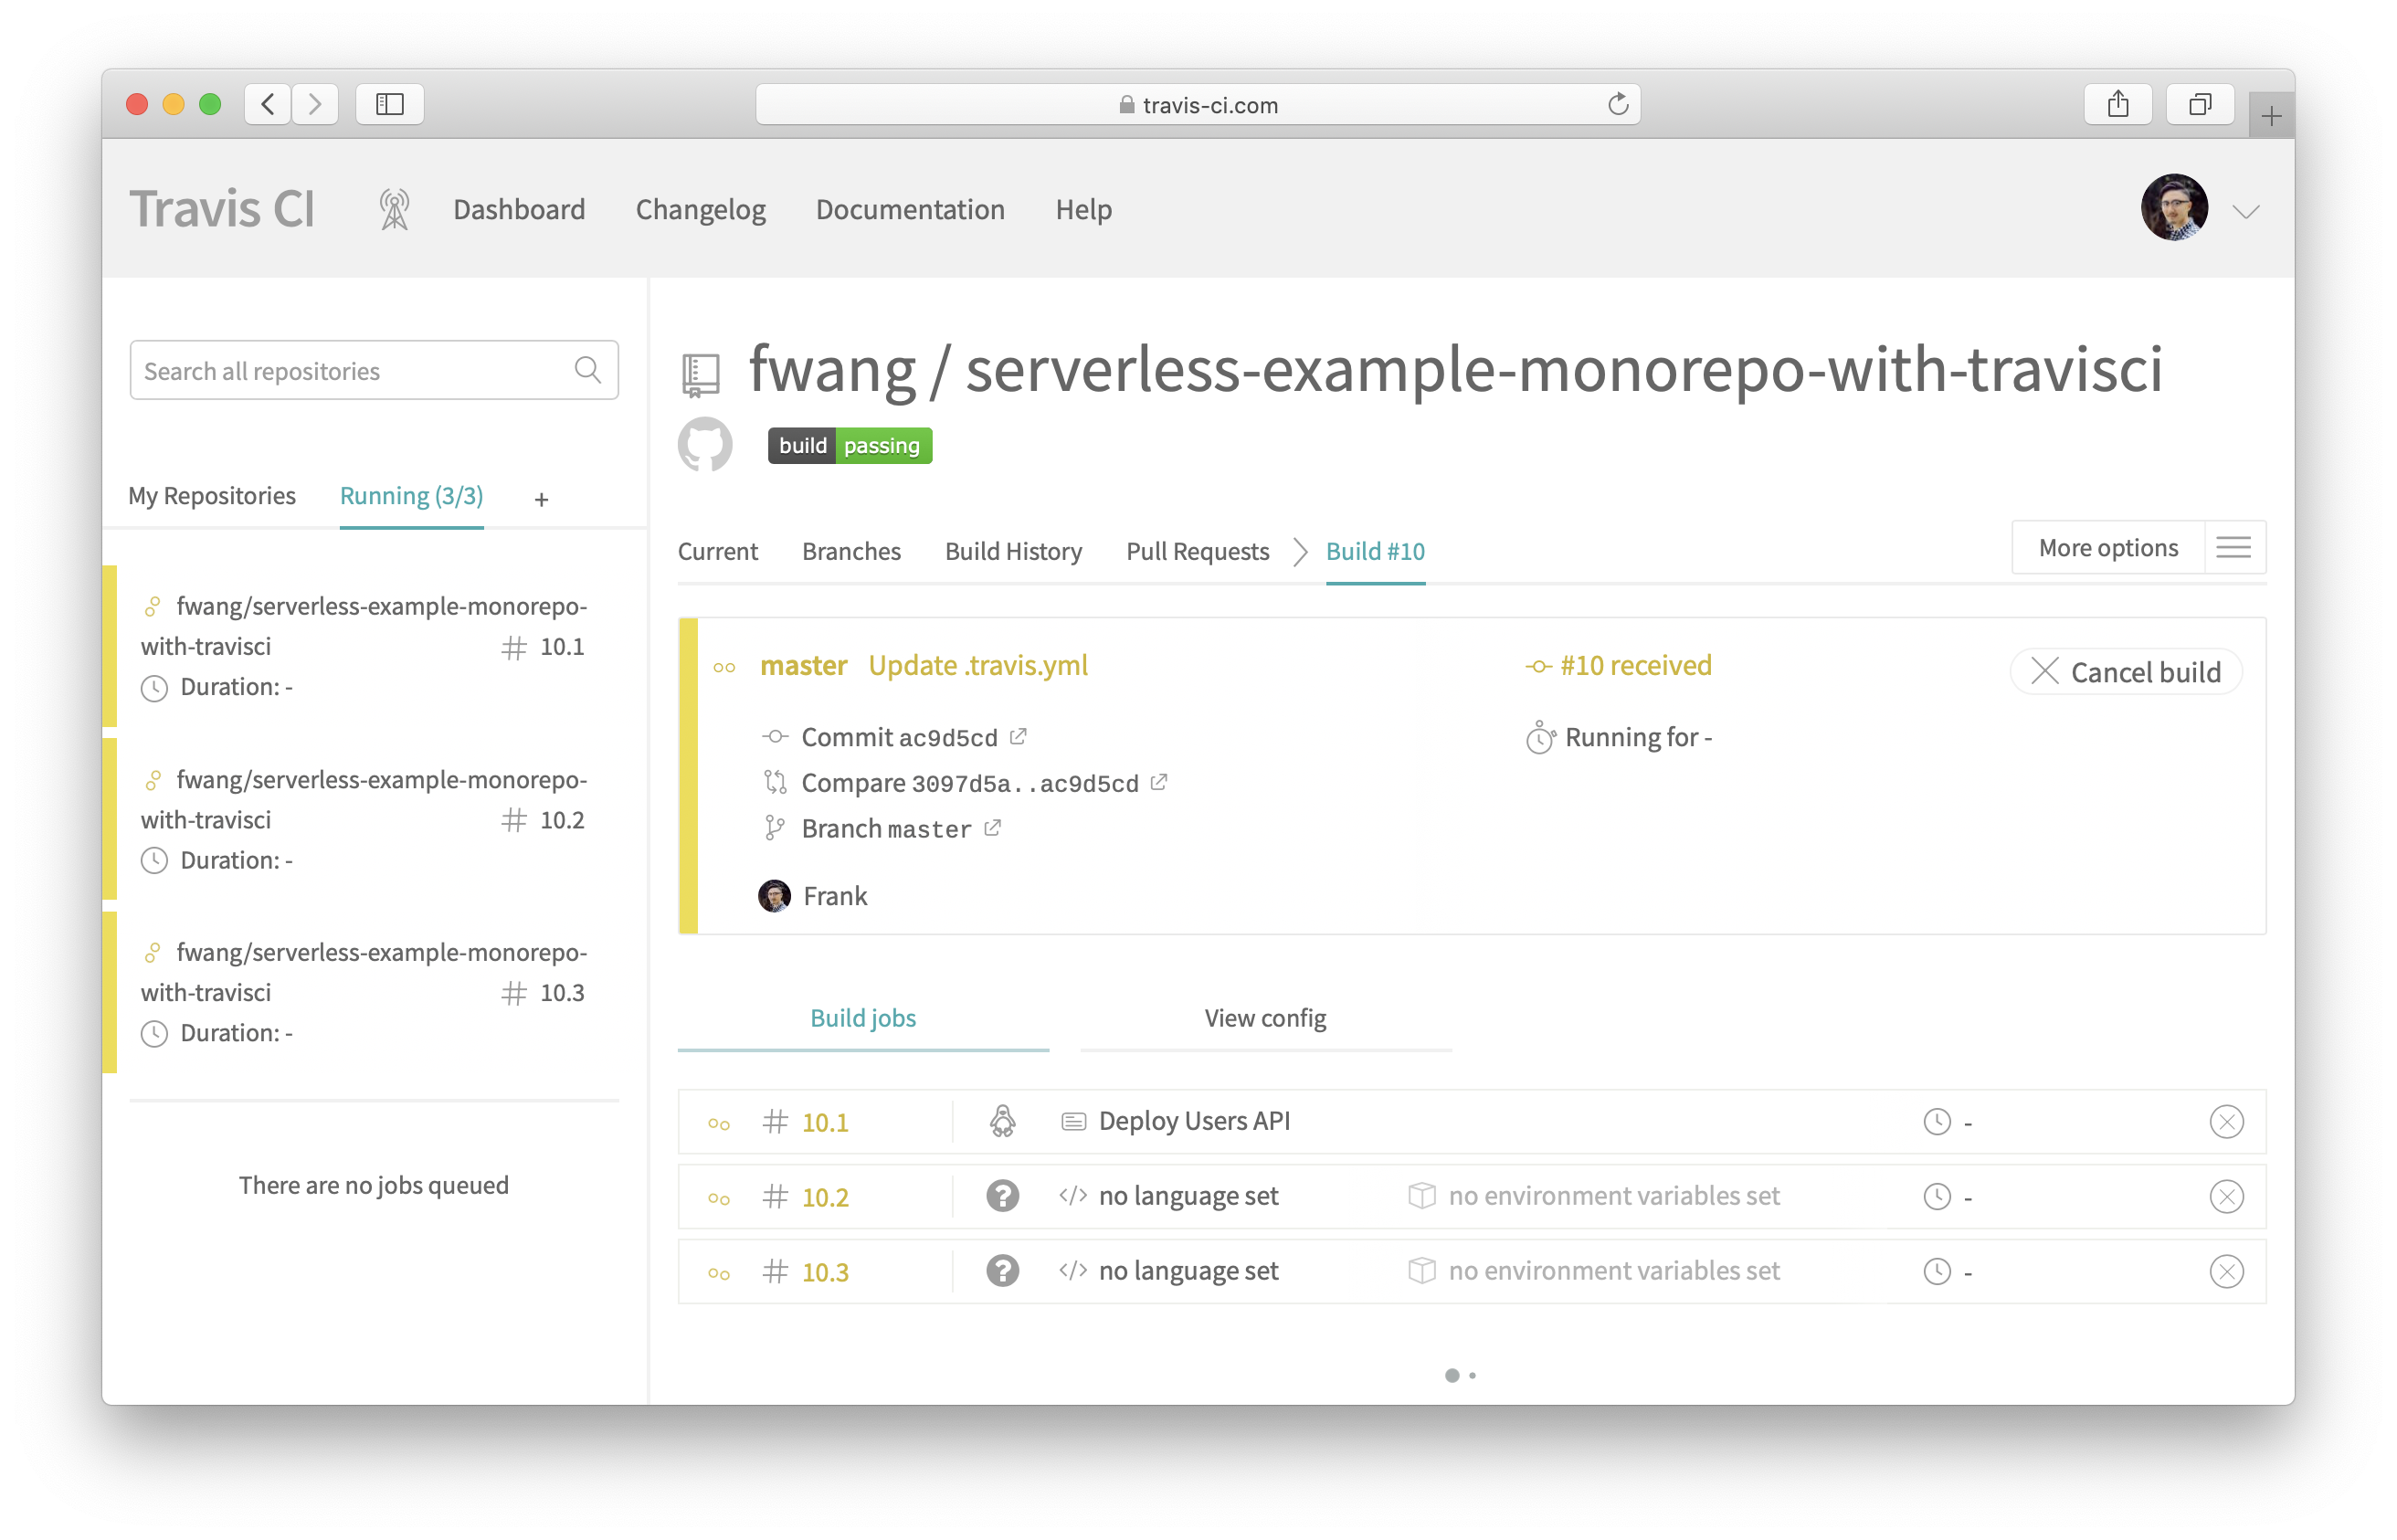
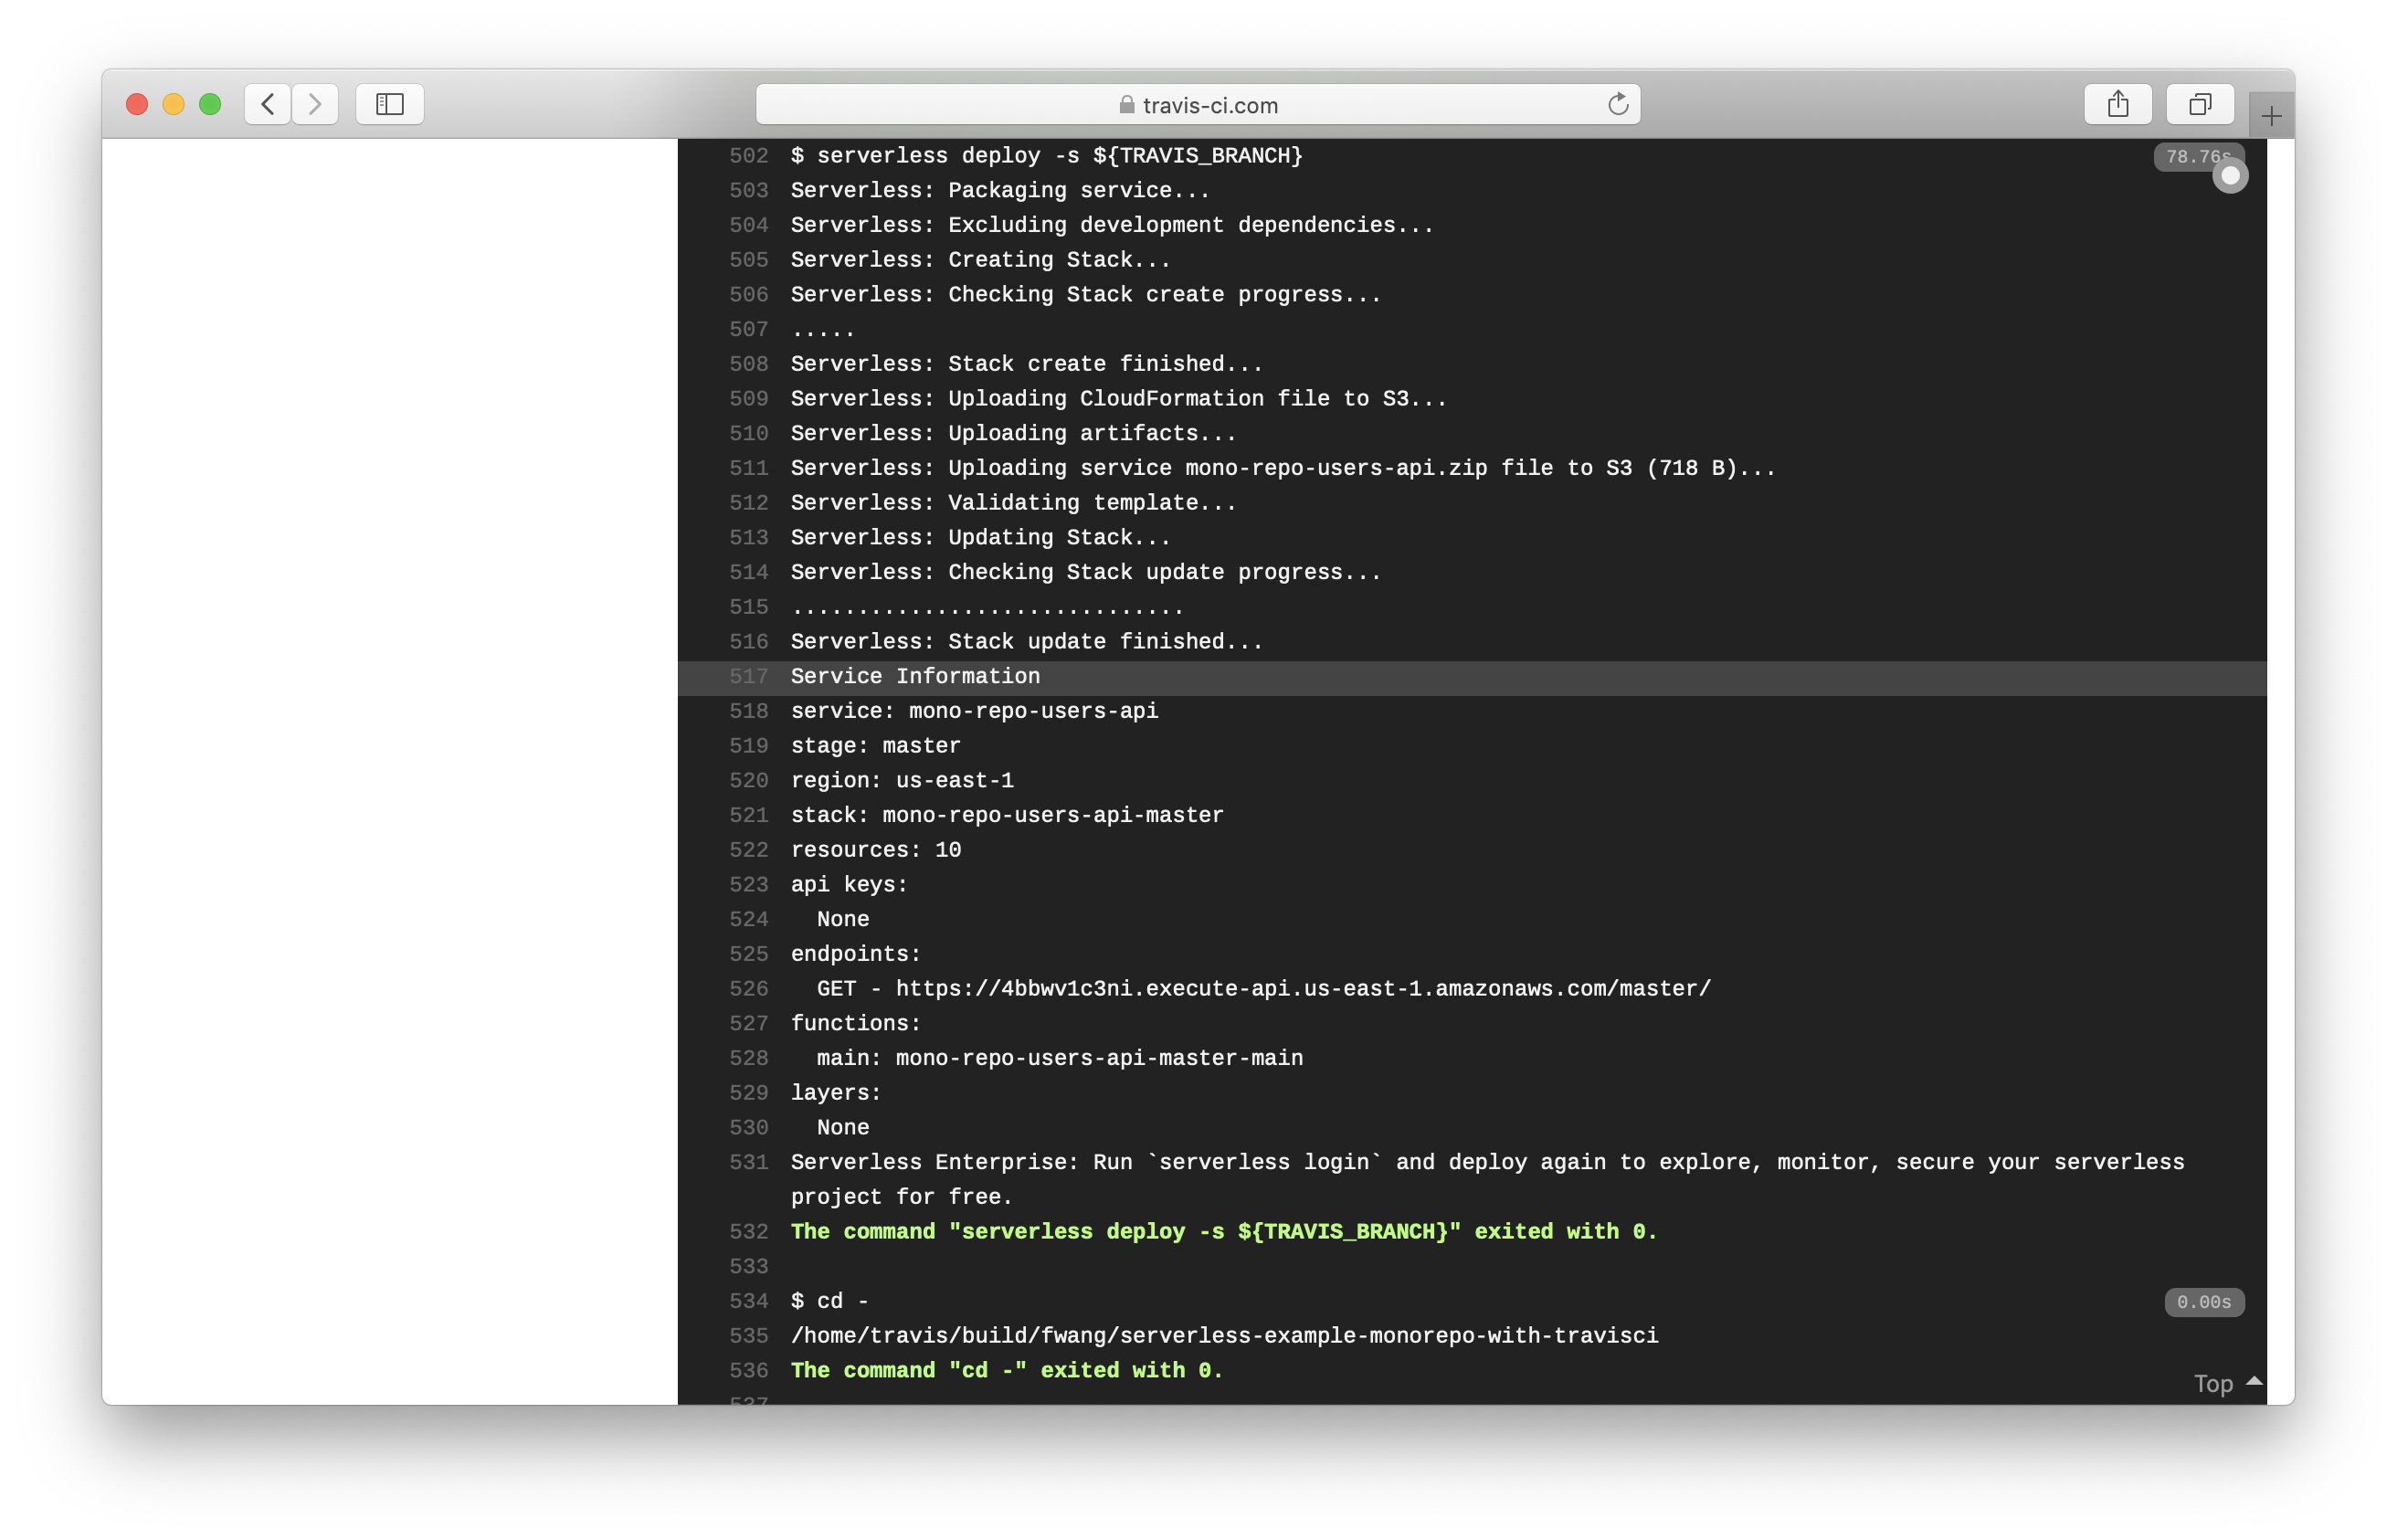
Click on a job. You will see the output for each of the steps. Scroll down to the Deploy application section, and you should see the output for the serverless deploy -s master command.
Now that we have the basics up and running, let’s look at how to deploy our app to multiple AWS accounts.
2. How to deploy to multiple AWS accounts
You might be curious as to why we would want to deploy to multiple AWS accounts. It’s a good practice to keep your development and production environments in separate accounts. By separating them completely, you can secure access to your production environment. This will reduce the likelihood of accidentally removing resources from it while developing.
To deploy to another account, repeat the earlier step of creating the environment variables, and create two more with the AWS Access Key Id and Secret Access Key of your production AWS account. Name them:
- AWS_ACCESS_KEY_ID_PRODUCTION, and
- AWS_SECRET_ACCESS_KEY_PRODUCTION
To prevent any confusion, rename the previously created AWS_ACCESS_KEY_ID and AWS_SECRET_ACCESS_KEY to AWS_ACCESS_KEY_ID_DEVELOPMENT and AWS_SECRET_ACCESS_KEY_DEVELOPMENT by removing and re-creating them.
Go to your GitHub repo and open .travis.yml. Replace it with the following:
language: node_js
node_js:
  - "8.10"

deploy_service_job: &DEPLOY_SERVICE_JOB
  cache:
    directories:
      - node_modules
      - ${SERVICE_PATH}/node_modules

  install:
    - npm install -g serverless
    - travis_retry npm install
    - cd ${SERVICE_PATH}
    - travis_retry npm install
    - cd -

  script:
    - cd ${SERVICE_PATH}
    - serverless deploy -s ${STAGE_NAME}
    - cd -

environments:
  - &PRODUCTION_ENV
    - AWS_ACCESS_KEY_ID=${AWS_ACCESS_KEY_ID_PRODUCTION}
    - AWS_SECRET_ACCESS_KEY=${AWS_SECRET_ACCESS_KEY_PRODUCTION}

  - &DEVELOPMENT_ENV
    - AWS_ACCESS_KEY_ID=${AWS_ACCESS_KEY_ID_DEVELOPMENT}
    - AWS_SECRET_ACCESS_KEY=${AWS_SECRET_ACCESS_KEY_DEVELOPMENT}

jobs:
  include:
    # non-master branches deploys to stage named by the branch
    - <<: *DEPLOY_SERVICE_JOB
      name: "Deploy Users API"
      if: type = push AND NOT branch = master
      env:
        - SERVICE_PATH="services/users-api"
        - STAGE_NAME=${TRAVIS_BRANCH}
        - *DEVELOPMENT_ENV
    - <<: *DEPLOY_SERVICE_JOB
      name: "Deploy Posts API"
      if: type = push AND NOT branch = master
      env:
        - SERVICE_PATH="services/posts-api"
        - STAGE_NAME=${TRAVIS_BRANCH}
        - *DEVELOPMENT_ENV
    - <<: *DEPLOY_SERVICE_JOB
      name: "Deploy Cron Job"
      if: type = push AND NOT branch = master
      env:
        - SERVICE_PATH="services/cron-job"
        - STAGE_NAME=${TRAVIS_BRANCH}
        - *DEVELOPMENT_ENV

    # master branch deploys to the 'prod' stage
    - <<: *DEPLOY_SERVICE_JOB
      name: "Deploy Users API"
      if: type = push AND branch = master
      env:
        - SERVICE_PATH="services/users-api"
        - STAGE_NAME=prod
        - *PRODUCTION_ENV
    - <<: *DEPLOY_SERVICE_JOB
      name: "Deploy Posts API"
      if: type = push AND branch = master
      env:
        - SERVICE_PATH="services/posts-api"
        - STAGE_NAME=prod
        - *PRODUCTION_ENV
    - <<: *DEPLOY_SERVICE_JOB
      name: "Deploy Cron Job"
      if: type = push AND branch = master
      env:
        - SERVICE_PATH="services/cron-job"
        - STAGE_NAME=prod
        - *PRODUCTION_ENV
This does a couple of things:
- A Git push to the master branch will be deployed to the prod stage, instead of the stage with the branch name. It’ll also use the Production AWS credentials.
- A Git push to all the other branches will be deployed to the stage with their branch name using the Development AWS credentials.
Commit and push this change. This will trigger Travis to build the master branch again. This time deploying to your production account.
Next, let’s look at implementing the PR aspect of our Git workflow.
3. How to deploy in pull request workflow
A big advantage of using Serverless is how easy and cost effective it is to deploy many different versions (ie. stages) of your app. A great use case for this is to deploy a version of your app for each pull request to preview how the merged version would work, similar to the idea of Review Apps on Heroku.
Go to your GitHub repo and open the .travis.yml that we had created above. Replace it with the following:
language: node_js
node_js:
  - "8.10"

deploy_service_job: &DEPLOY_SERVICE_JOB
  cache:
    directories:
      - node_modules
      - ${SERVICE_PATH}/node_modules

  install:
    - npm install -g serverless
    - travis_retry npm install
    - cd ${SERVICE_PATH}
    - travis_retry npm install
    - cd -

  script:
    - cd ${SERVICE_PATH}
    - serverless deploy -s ${STAGE_NAME}
    - cd -

environments:
  - &PRODUCTION_ENV
    - AWS_ACCESS_KEY_ID=${AWS_ACCESS_KEY_ID_PRODUCTION}
    - AWS_SECRET_ACCESS_KEY=${AWS_SECRET_ACCESS_KEY_PRODUCTION}

  - &DEVELOPMENT_ENV
    - AWS_ACCESS_KEY_ID=${AWS_ACCESS_KEY_ID_DEVELOPMENT}
    - AWS_SECRET_ACCESS_KEY=${AWS_SECRET_ACCESS_KEY_DEVELOPMENT}

jobs:
  include:
    # non-master branches deploys to stage named by the branch
    - <<: *DEPLOY_SERVICE_JOB
      name: "Deploy Users API"
      if: type = push AND NOT branch = master
      env:
        - SERVICE_PATH="services/users-api"
        - STAGE_NAME=${TRAVIS_BRANCH}
        - *DEVELOPMENT_ENV
    - <<: *DEPLOY_SERVICE_JOB
      name: "Deploy Posts API"
      if: type = push AND NOT branch = master
      env:
        - SERVICE_PATH="services/posts-api"
        - STAGE_NAME=${TRAVIS_BRANCH}
        - *DEVELOPMENT_ENV
    - <<: *DEPLOY_SERVICE_JOB
      name: "Deploy Cron Job"
      if: type = push AND NOT branch = master
      env:
        - SERVICE_PATH="services/cron-job"
        - STAGE_NAME=${TRAVIS_BRANCH}
        - *DEVELOPMENT_ENV

    # pull requests deploys to the 'PR#' stage
    - <<: *DEPLOY_SERVICE_JOB
      name: "Deploy Users API"
      if: type = pull_request
      env:
        - SERVICE_PATH="services/users-api"
        - STAGE_NAME=pr${TRAVIS_PULL_REQUEST}
        - *DEVELOPMENT_ENV
    - <<: *DEPLOY_SERVICE_JOB
      name: "Deploy Posts API"
      if: type = pull_request
      env:
        - SERVICE_PATH="services/posts-api"
        - STAGE_NAME=pr${TRAVIS_PULL_REQUEST}
        - *DEVELOPMENT_ENV
    - <<: *DEPLOY_SERVICE_JOB
      name: "Deploy Cron Job"
      if: type = pull_request
      env:
        - SERVICE_PATH="services/cron-job"
        - STAGE_NAME=pr${TRAVIS_PULL_REQUEST}
        - *DEVELOPMENT_ENV

    # master branch deploys to the 'prod' stage
    - <<: *DEPLOY_SERVICE_JOB
      name: "Deploy Users API"
      if: type = push AND branch = master
      env:
        - SERVICE_PATH="services/users-api"
        - STAGE_NAME=prod
        - *PRODUCTION_ENV
    - <<: *DEPLOY_SERVICE_JOB
      name: "Deploy Posts API"
      if: type = push AND branch = master
      env:
        - SERVICE_PATH="services/posts-api"
        - STAGE_NAME=prod
        - *PRODUCTION_ENV
    - <<: *DEPLOY_SERVICE_JOB
      name: "Deploy Cron Job"
      if: type = push AND branch = master
      env:
        - SERVICE_PATH="services/cron-job"
        - STAGE_NAME=prod
        - *PRODUCTION_ENV
Let’s go over the changes we’ve made.
- Travis provides a convenient environment variable named $TRAVIS_PULL_REQUEST with the pull request number.
- We will set the stage name to pr# and use the Development AWS credentials when deploying a pull request.
Commit these changes to .travis.yml.
Next, go to GitHub and create a pull request to the master branch. This will trigger Travis to deployed the merged code with stage name pr1 to your development account.
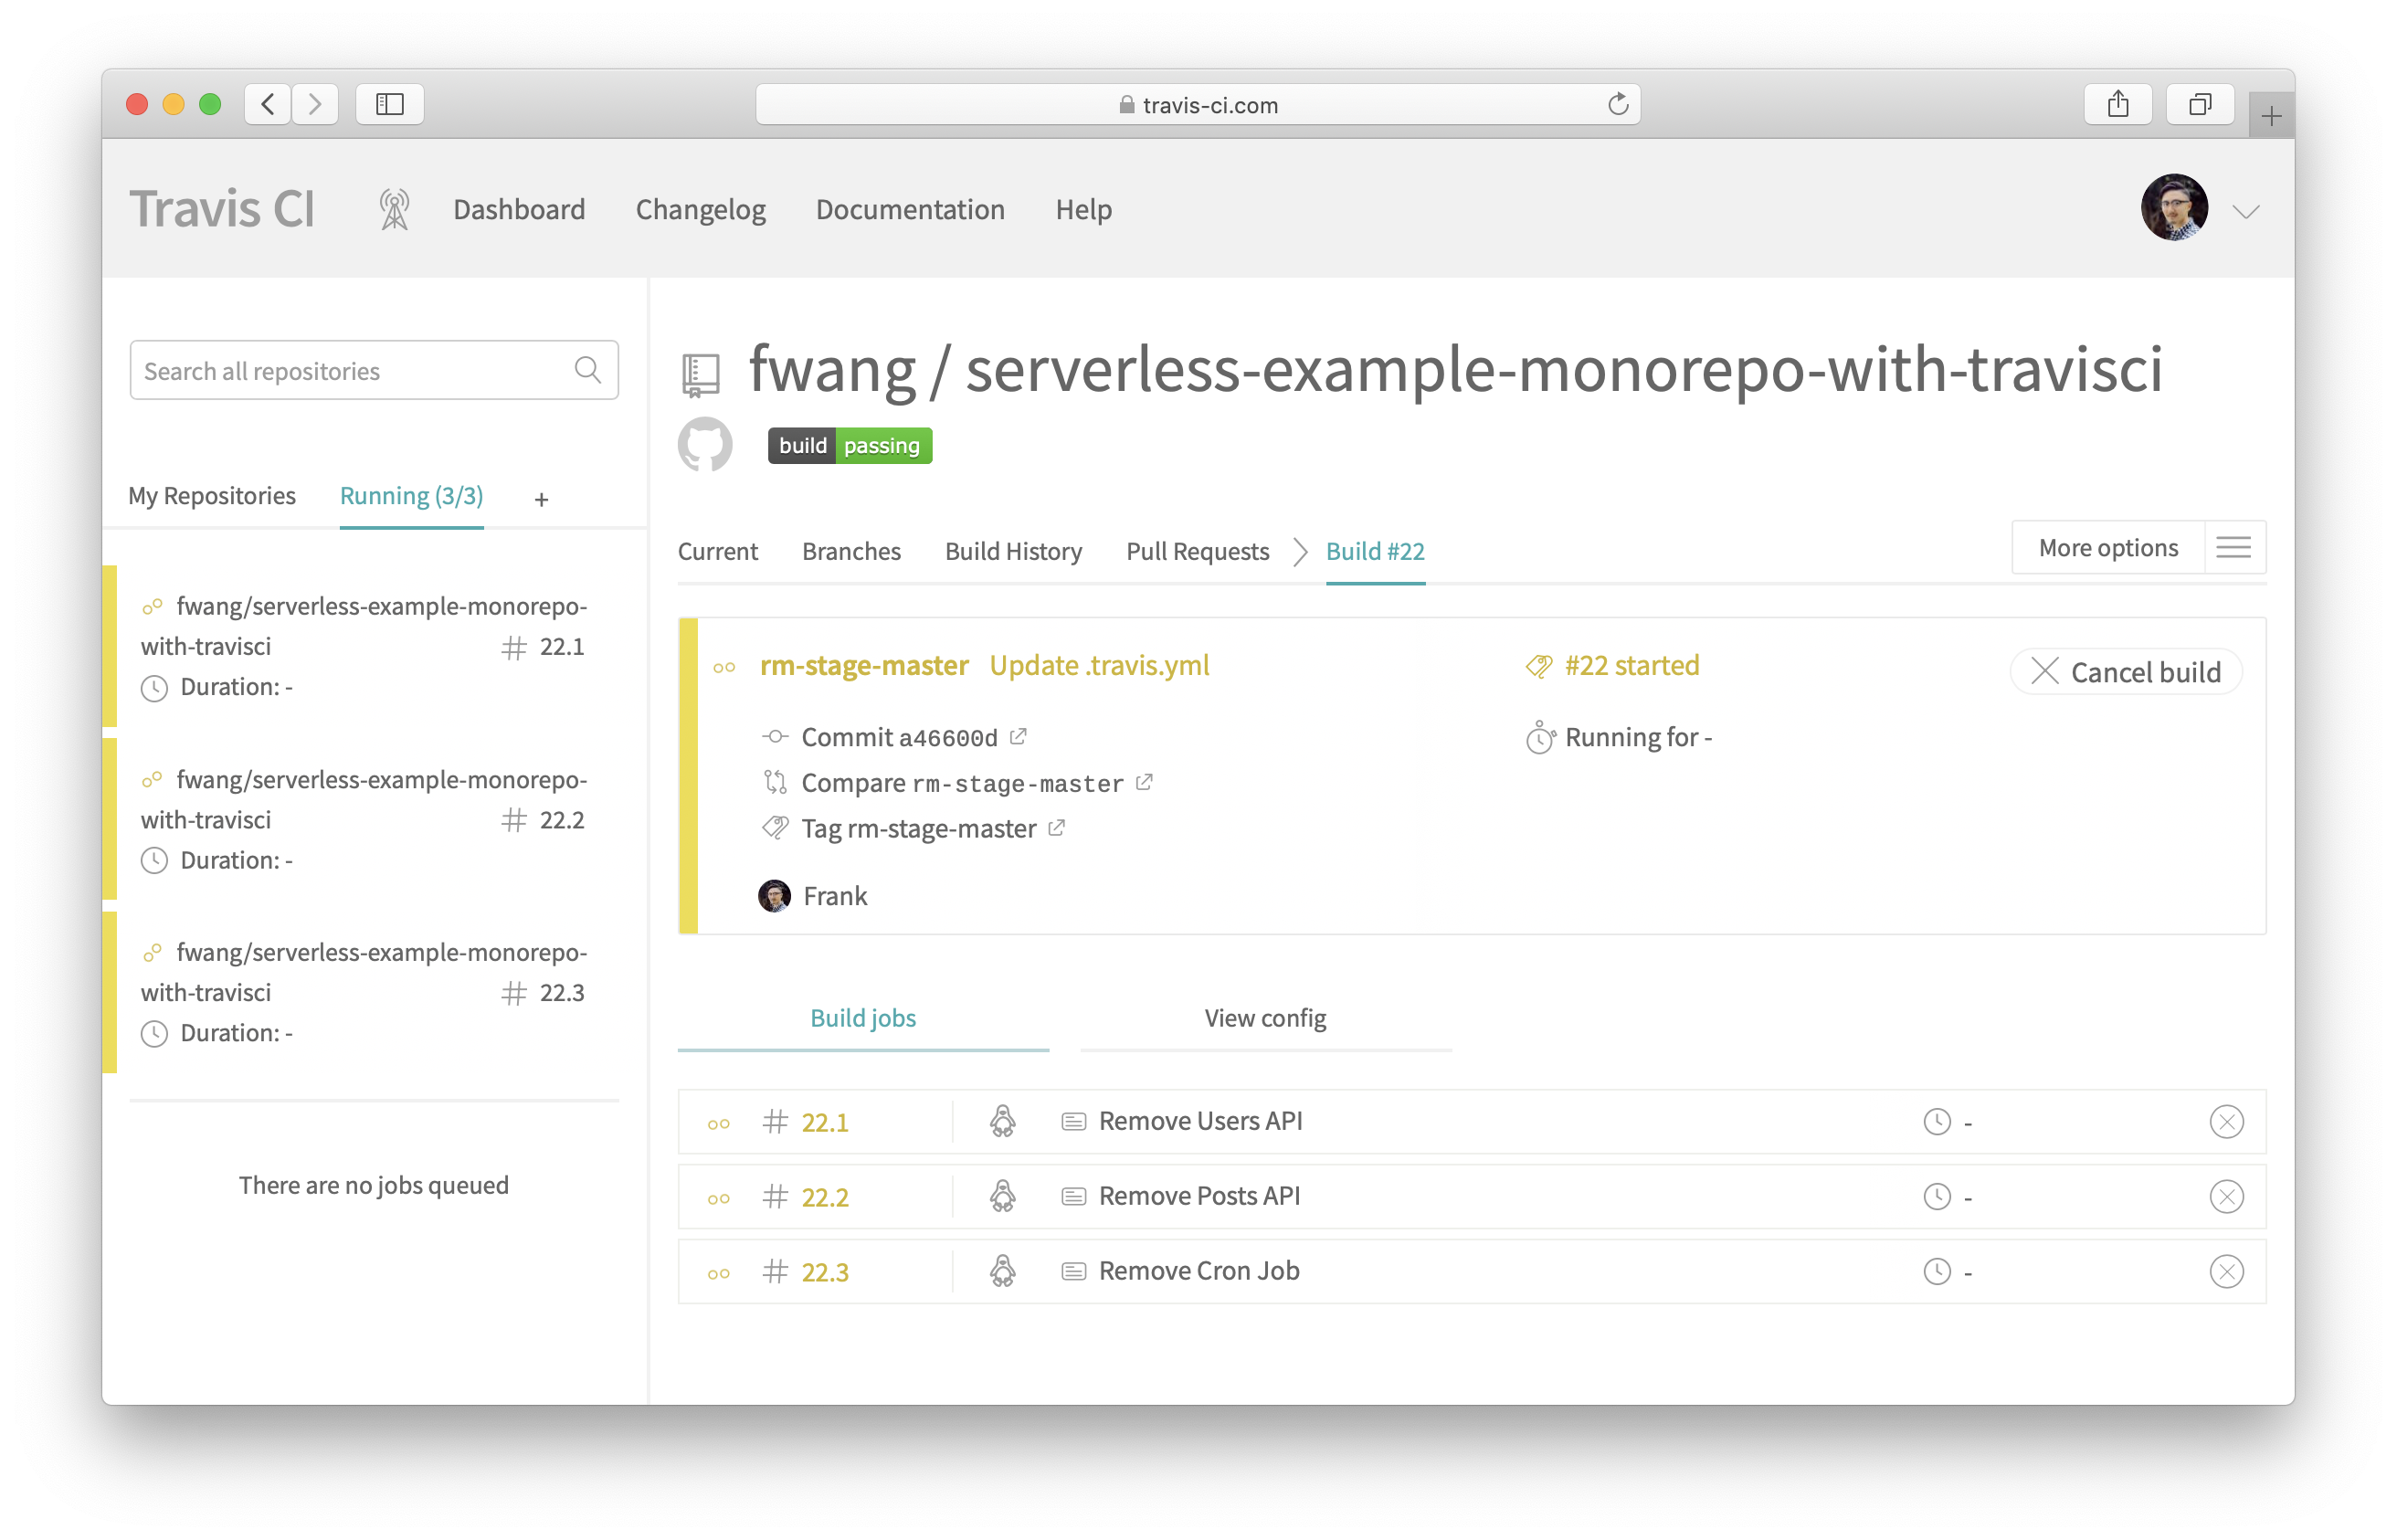
4. How to clean up unused branches and closed pull requests
After a feature branch is deleted, or a pull request closed, you want to clean up the resources in your AWS account. Travis does not have triggers for these events on GitHub. If you have the credentials for your AWS account, you can perhaps remove the resources by going into each service directory on your local machine and running serverless remove. This step is both cumbersome and not ideal.
To get around this limitation, we’ll use a little trick. We’ll tell Travis to remove a stage (instead of deploying to one) if it sees a Git tag called rm-stage-STAGE_NAME.
To do this, go to your GitHub repo and open .travis.yml that we created above. Replace it with the following:
language: node_js
node_js:
  - "8.10"

deploy_service_job: &DEPLOY_SERVICE_JOB
  cache:
    directories:
      - node_modules
      - ${SERVICE_PATH}/node_modules

  install:
    - npm install -g serverless
    - travis_retry npm install
    - cd ${SERVICE_PATH}
    - travis_retry npm install
    - cd -

  script:
    - cd ${SERVICE_PATH}
    - serverless deploy -s ${STAGE_NAME}
    - cd -

remove_service_job: &REMOVE_SERVICE_JOB
  cache:
    directories:
      - node_modules
      - ${SERVICE_PATH}/node_modules

  install:
    - npm install -g serverless
    - travis_retry npm install
    - cd ${SERVICE_PATH}
    - travis_retry npm install
    - cd -

  script:
    - cd ${SERVICE_PATH}
    - serverless remove -s ${STAGE_NAME}
    - cd -

environments:
  - &PRODUCTION_ENV
    - AWS_ACCESS_KEY_ID=${AWS_ACCESS_KEY_ID_PRODUCTION}
    - AWS_SECRET_ACCESS_KEY=${AWS_SECRET_ACCESS_KEY_PRODUCTION}

  - &DEVELOPMENT_ENV
    - AWS_ACCESS_KEY_ID=${AWS_ACCESS_KEY_ID_DEVELOPMENT}
    - AWS_SECRET_ACCESS_KEY=${AWS_SECRET_ACCESS_KEY_DEVELOPMENT}

jobs:
  include:
    # non-master branches deploys to stage named by the branch
    - <<: *DEPLOY_SERVICE_JOB
      name: "Deploy Users API"
      if: tag !~ /^rm-stage-.*/ AND type = push AND NOT branch = master
      env:
        - SERVICE_PATH="services/users-api"
        - STAGE_NAME=${TRAVIS_BRANCH}
        - *DEVELOPMENT_ENV
    - <<: *DEPLOY_SERVICE_JOB
      name: "Deploy Posts API"
      if: tag !~ /^rm-stage-.*/ AND type = push AND NOT branch = master
      env:
        - SERVICE_PATH="services/posts-api"
        - STAGE_NAME=${TRAVIS_BRANCH}
        - *DEVELOPMENT_ENV
    - <<: *DEPLOY_SERVICE_JOB
      name: "Deploy Cron Job"
      if: tag !~ /^rm-stage-.*/ AND type = push AND NOT branch = master
      env:
        - SERVICE_PATH="services/cron-job"
        - STAGE_NAME=${TRAVIS_BRANCH}
        - *DEVELOPMENT_ENV

    # pull requests deploys to the 'PR#' stage
    - <<: *DEPLOY_SERVICE_JOB
      name: "Deploy Users API"
      if: tag !~ /^rm-stage-.*/ AND type = pull_request
      env:
        - SERVICE_PATH="services/users-api"
        - STAGE_NAME=pr${TRAVIS_PULL_REQUEST}
        - *DEVELOPMENT_ENV
    - <<: *DEPLOY_SERVICE_JOB
      name: "Deploy Posts API"
      if: tag !~ /^rm-stage-.*/ AND type = pull_request
      env:
        - SERVICE_PATH="services/posts-api"
        - STAGE_NAME=pr${TRAVIS_PULL_REQUEST}
        - *DEVELOPMENT_ENV
    - <<: *DEPLOY_SERVICE_JOB
      name: "Deploy Cron Job"
      if: tag !~ /^rm-stage-.*/ AND type = pull_request
      env:
        - SERVICE_PATH="services/cron-job"
        - STAGE_NAME=pr${TRAVIS_PULL_REQUEST}
        - *DEVELOPMENT_ENV

    # master branch deploys to the 'prod' stage
    - <<: *DEPLOY_SERVICE_JOB
      name: "Deploy Users API"
      if: tag !~ /^rm-stage-.*/ AND type = push AND branch = master
      env:
        - SERVICE_PATH="services/users-api"
        - STAGE_NAME=prod
        - *PRODUCTION_ENV
    - <<: *DEPLOY_SERVICE_JOB
      name: "Deploy Posts API"
      if: tag !~ /^rm-stage-.*/ AND type = push AND branch = master
      env:
        - SERVICE_PATH="services/posts-api"
        - STAGE_NAME=prod
        - *PRODUCTION_ENV
    - <<: *DEPLOY_SERVICE_JOB
      name: "Deploy Cron Job"
      if: tag !~ /^rm-stage-.*/ AND type = push AND branch = master
      env:
        - SERVICE_PATH="services/cron-job"
        - STAGE_NAME=prod
        - *PRODUCTION_ENV

    # remove non-production stages
    - <<: *REMOVE_SERVICE_JOB
      name: "Remove Users API"
      if: tag =~ /^rm-stage-.*/
      env:
        - SERVICE_PATH="services/users-api"
        - STAGE_NAME=${TRAVIS_TAG:9}
        - *DEVELOPMENT_ENV
    - <<: *REMOVE_SERVICE_JOB
      name: "Remove Posts API"
      if: tag =~ /^rm-stage-.*/
      env:
        - SERVICE_PATH="services/posts-api"
        - STAGE_NAME=${TRAVIS_TAG:9}
        - *DEVELOPMENT_ENV
    - <<: *REMOVE_SERVICE_JOB
      name: "Remove Cron Job"
      if: tag =~ /^rm-stage-.*/
      env:
        - SERVICE_PATH="services/cron-job"
        - STAGE_NAME=${TRAVIS_TAG:9}
        - *DEVELOPMENT_ENV
Let’s look at what we changed here:
- We created a new job called remove_service_job.
- It’s similar to our deploy_service_job job, except it runs
serverless remove. It assumes the name of the tag is of the formatrm-stage-STAGE_NAME. It parses for the stage name after the 2nd hyphen. - We also defined 3 jobs that runs the remove_service_job for each service, while passing in the path of the service.
To test this, try tagging the pull request branch before you close the PR.
$ git tag rm-stage-pr1
$ git push --tags
You’ll notice that the pr1 stage will be removed from your development account.
And that’s it! Let’s wrap things up next.
Next steps
It took us a few steps but we now have a fully-functional CI/CD pipeline for our monorepo Serverless app. It supports a PR based workflow and even cleans up once a PR is merged. The repo used in this guide is available here with the complete Travis CI configs.
Some helpful next steps would be to auto-create custom domains for your API endpoints, send out Slack or email notifications, generate CloudFormation change sets and add a manual confirmation step when pushing to production, etc. You also might want to design your workflow to accommodate for any dependencies your services might have. These are cases where the output from one service is used in another.
Finally, if you are not familiar with Seed, it’s worth noting that it’ll do all of the above for you out of the box! And you don’t need to write up a build spec or do any scripting.
Do your Serverless deployments take too long? Incremental deploys in Seed can speed it up 100x!
Learn More