Adding a Build Spec
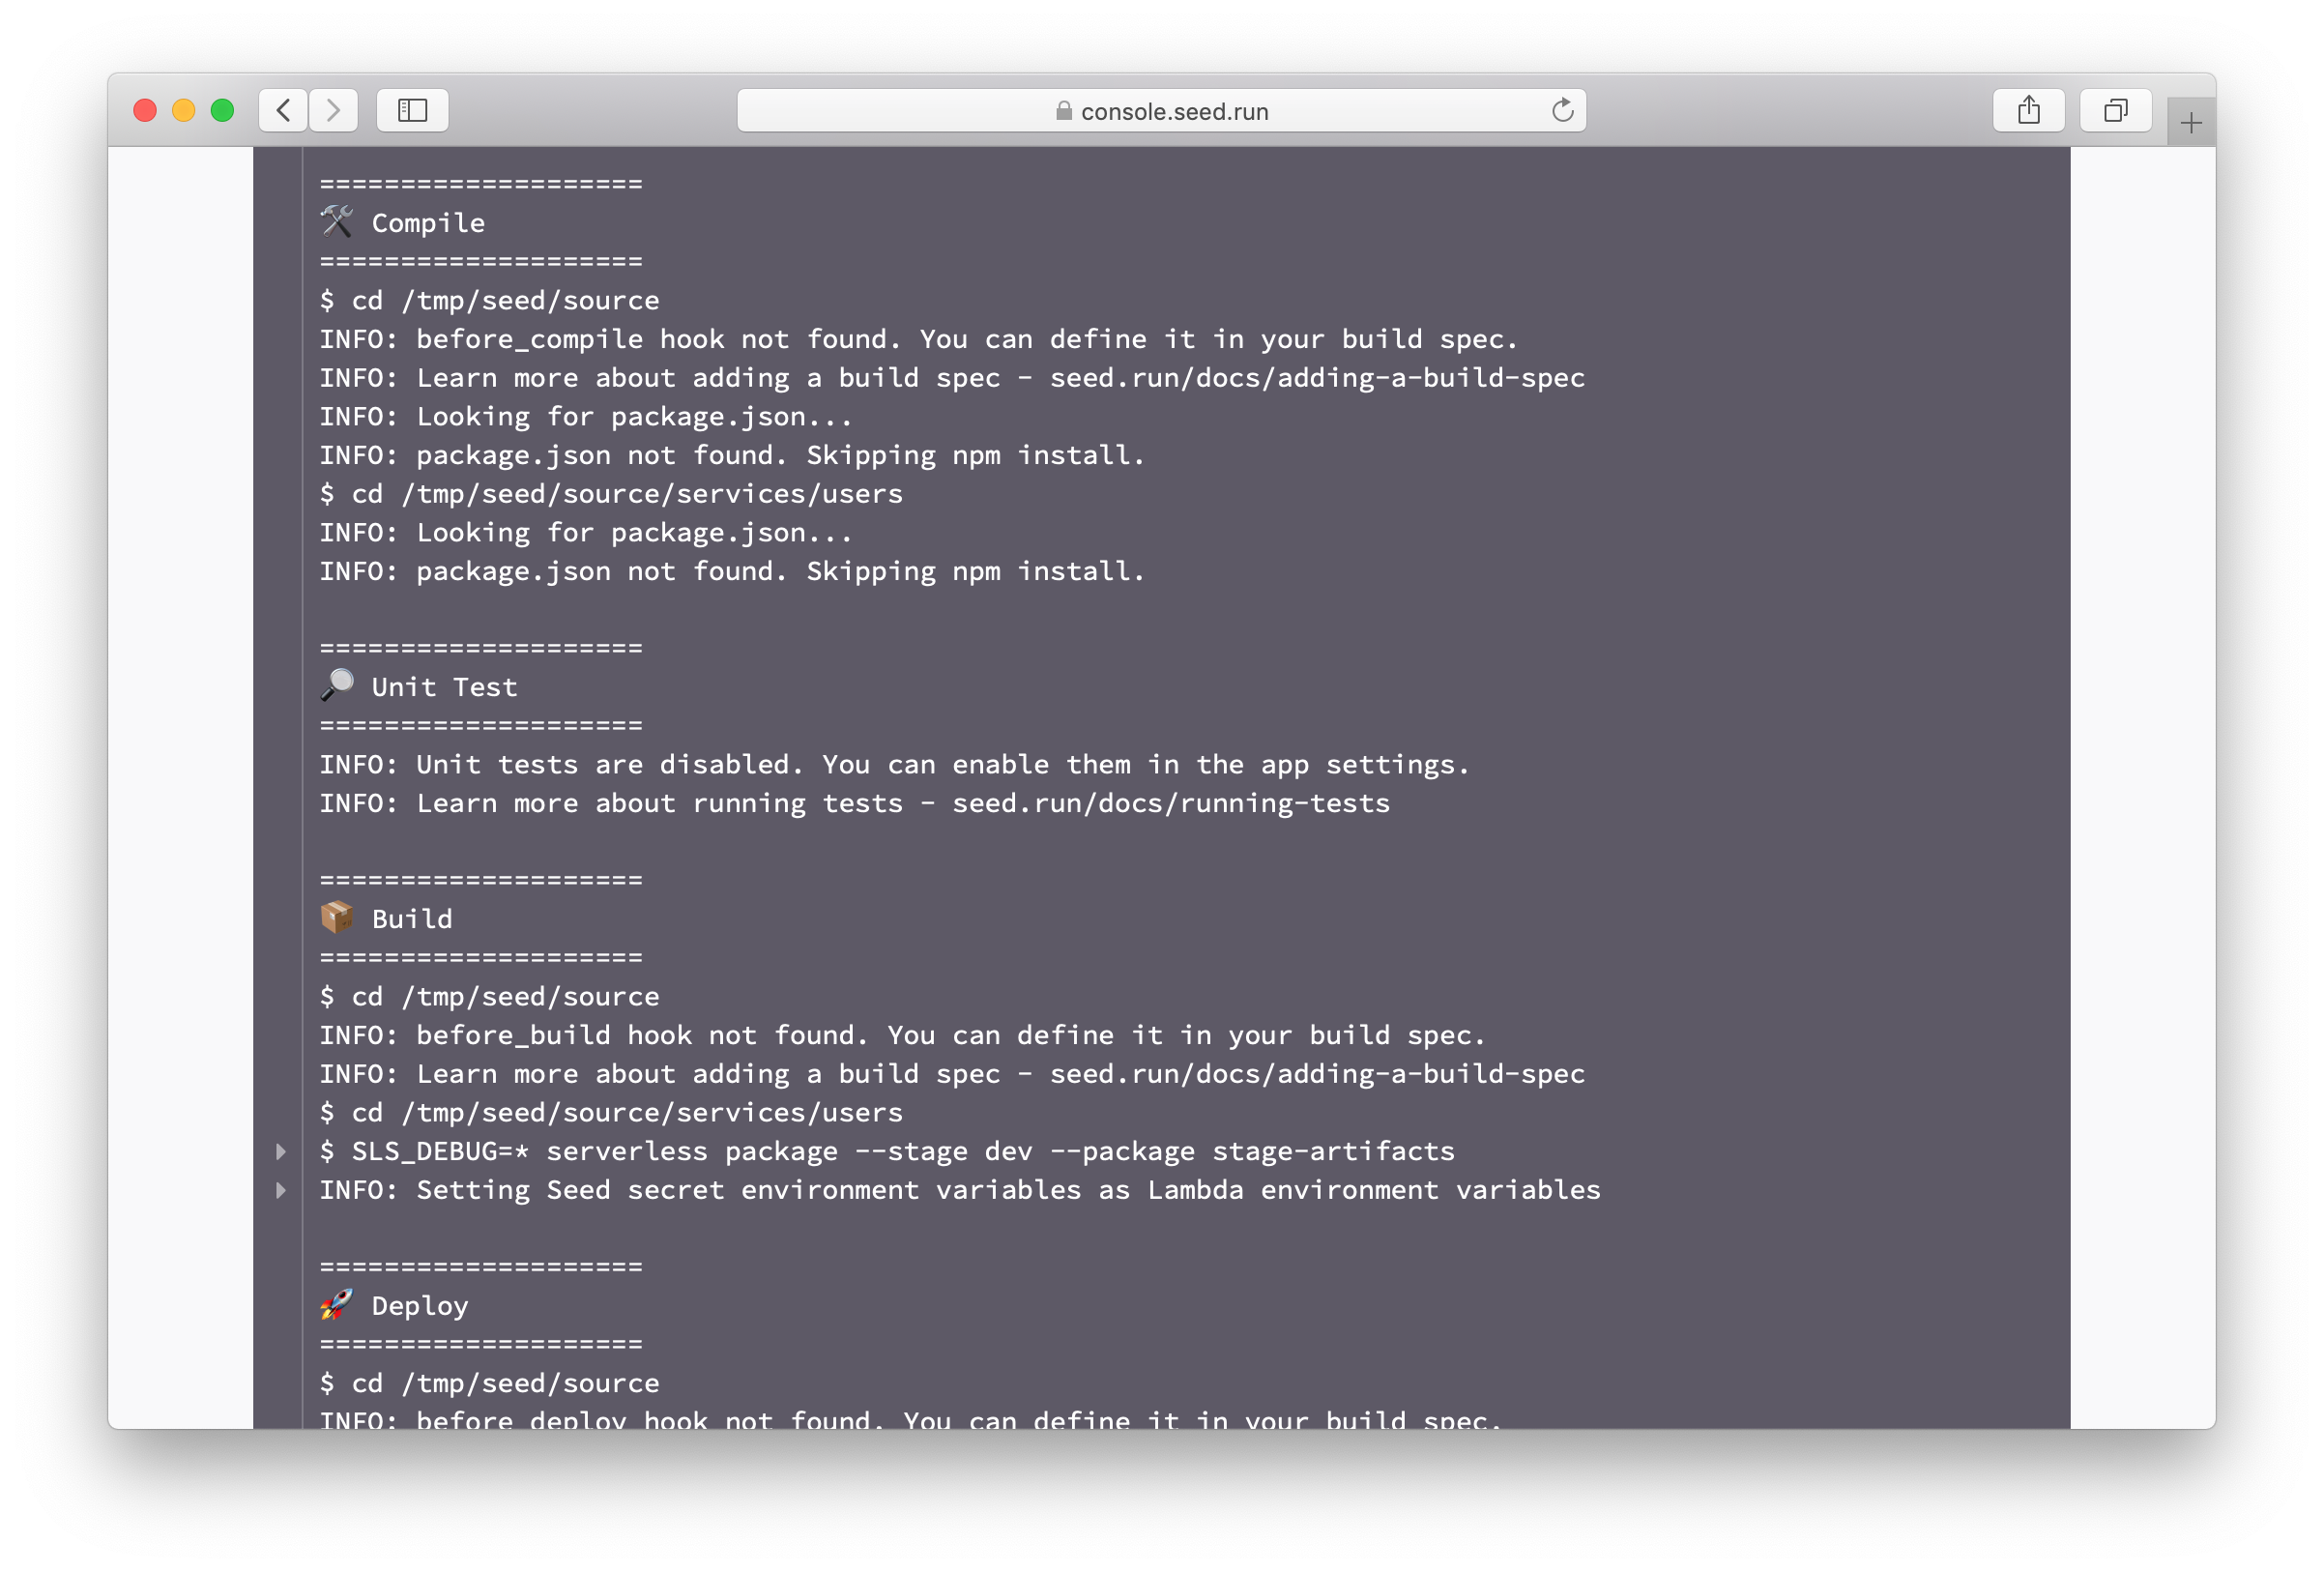
While Seed does not need a build spec to configure your pipelines or your project, there are cases where you need to run some scripts during the build process. You can get a sense of the different build steps by looking at one of your build logs.
Seed.yml
To hook into the build process, add a seed.yml in the root of your project directory. Here is the basic skeleton of our build spec.
before_compile:
  - echo "Before compile"

#compile:
#  - echo "Override compile"

before_build:
  - echo "Before build"

before_deploy:
  - echo "Before deploy"

after_deploy:
  - echo "After deploy"

before_remove:
  - echo "Before deploy"

after_remove:
  - echo "After deploy"
A couple of things to keep in mind when adding commands to your build spec.
-
The build spec commands are run at the root of the repo. So if you want to run a command for a specific service, you’ll need to
cdinto it. Check out this example on how to do this.The build spec commands are run at the root of the repo
-
Each command is run in its own shell. This means that if you
cdinto a different directory in one command, it isn’t carried over to the next.Each build spec command is run in its own shell
So for this example.
before_compile:
  - cd services/posts && echo $PWD
  - echo $PWD
The two commands will print out different working directories.
Below is a brief description of the build steps.
Build steps
-
before_compileSeed starts the build process by doing a
npm install(for Node.js projects),pip install -r requirements.txt(for Python projects), ormake(for Go projects). Thebefore_compilestep let’s you run commands before this. This can be useful for configuring private npm modules. -
compileOverride the default compile commands. This can be useful if you are using a custom package manager like
pnpmorNx. -
before_buildThe actual build portion for Seed is the
serverless packagecommand that creates the build. Thebefore_buildstep let’s you run your commands before this happens. -
before_deployAfter the build packages are created, Seed deploys these using the
serverless deploycommand. Thebefore_deploylet’s you run your commands before this happens. This step is run for all services and also when they are promoted to production. You can distinguish between the cases by using the$SEED_STAGE_NAMEbuild environment variable. -
after_deployAfter the deployment is complete you can use the
after_deploystep to run any post deployment scripts you might have. Again, this step is run for all services and also when they are promoted to production. You can distinguish between the cases by using the$SEED_STAGE_NAMEbuild environment variable.Note that for SST apps, Seed uses an integrated deployment process (to make your CDK deployments free). So any script executed after the deployment, is run in a separate build process.
-
before_removeSeed runs the
serverless removecommand to remove a deployed service. Thebefore_removestep let’s you run any commands before this happens. Note that, this step is only run when a service is being removed. -
after_removeSimilar to the
before_remove, theafter_removestep is run after a service has been removed. This can be used to run any cleanup scripts you might have.Note that the
after_removestep is currently only supported for Serverless Framework apps.
Other Options
Apart from the build hooks, there are a couple of other options that can help you customize the Seed build process.
Ignoring code changes
You can use ignore_paths and include_paths to exclude file path patterns from triggering a deploy.
-
include_pathsIf none of the paths matches what’s in
include_paths, the deploy will be skipped. But if there’s one or more paths that matches, the deploy will proceed, even if others do not match.include_paths: - services/** -
ignore_pathsIf every path matches what’s in
ignore_paths, the deploy will be skipped. But if there’s one or more paths that doesn’t match, the deploy will proceed, even if others do match.ignore_paths: - docs/** - README.md
Alternatively, you can specify a bash command to dynamically generate a comma-separated list of paths to ignore.
ignore_paths: >
  if [ $SEED_SERVICE_NAME = 'core' ]; then
    echo 'README.md,docs/**'
  elif [ $SEED_SERVICE_NAME = 'docs' ]; then
    echo 'README.md,core/**'
  else
    echo 'README.md,core/**,docs/**'
  fi
You can also execute a bash or Node.js script outputting the desired paths.
ignore_paths: node ignore-paths.js
The corresponding ignore-paths.js script:
if (process.env.SEED_SERVICE_NAME === "core") {
  console.log("README.md,docs/**");
} else if (process.env.SEED_SERVICE_NAME === "docs") {
  console.log("README.md,core/**");
} else {
  console.log("README.md,core/**,docs/**");
}
The following environment variables are available for the command:
$SEED_APP_NAME: The app name.$SEED_STAGE_NAME: The name of the stage that is being built. The stage names are exactly as shown in the console.$SEED_SERVICE_NAME: The name of the service.
Checking code changes
Seed by default checks the Git log to see if a service has been updated, before deploying it. You can read more about this in our Deploying Monorepo Apps chapter.
Add the following to either, disable this check:
check_code_change: false
Use the Lerna algorithm:
check_code_change: lerna
Or use the pnpm algorithm instead:
check_code_change: pnpm
Filter pull request branches
Seed by default deploys all pull requests when auto-deploy pull requests is enabled. You have the option to filter the pull requests to deploy by the source branches.
pull_request:
  source_branches:
    - feature/**
    - release/**
Similarly, you can filter by target branches.
pull_request:
  target_branches:
    - main
Disable pull request drafts
While Seed deploys draft pull requests by default, you can modify this behavior to deploy only when the pull request is marked as ready for review. Note that this option is currently only supported for GitHub.
pull_request:
  deploy_drafts: false
Disable pull request updates
If you prefer Seed to deploy pull requests only upon creation, and not upon subsequent pushes or commits, you can disable the automatic deployment on pushes.
pull_request:
  deploy_pushes: false
Customize stage names
The stage name is central to the way Seed manages deployments and resources for your Serverless app. It is either specified manually or Seed automatically generates it based on the auto-deployed branch. If it’s being generated, Seed will sanitize the branch names so it works with Serverless Framework and AWS.
However, there might be rare cases where you might wish to customize the automatically generated stage names. To do so, specify a bash command using the stage_name_constructor option. Note that:
- This only applies to auto-deployed branches.
- It’s only run the first time, while creating the stage.
- The command needs to print out a string to stdout.
- It has access to the
$SEED_STAGE_BRANCHenvironment variable. - There’s a timeout of 2 seconds for the command.
- If the commands fails or times out, Seed will use the automatically generated stage name.
Let’s look at an example. Say your feature branches have the naming convention feature/feature-name. However, you want the stage names to be feature-name. And you don’t want to transform some specific branch names. Add the following to your seed.yml.
stage_name_constructor: >
  if [ $SEED_STAGE_BRANCH = 'master' ]; then
    echo 'master'
  elif [ $SEED_STAGE_BRANCH = 'beta' ]; then
    echo 'beta'
  else
    echo $SEED_STAGE_BRANCH | cut -d'/' -f2
  fi
Disable downstream artifacts
Seed by default generates some build artifacts for downstream stages. These artifacts are used to generate CloudFormation change sets when promoting. You have the option to disable generating these artifacts if you are not promoting builds across stages. You can read more about this in our Promoting to Production chapter.
Add the following to your seed.yml to disable generating artifacts.
disable_artifacts: true
Disable setting secrets as Lambda environment variables
For Serverless Framework applications, Seed by default sets secrets as Lambda environment variables. And you can then access them in your Node.js Lambda functions using the process.env object.
Add the following to your seed.yml to opt out of this behavior.
sls_set_secret_envs: false
Disable ignoring dockerizePip
For Serverless Framework applications using the serverless-python-requirements plugin, Seed by default ignores the dockerizePip option. However, you can choose to override this behavior if you need Docker for packaging your Python modules.
Add the following to your seed.yml to opt out of this behavior:
sls_ignore_dockerize_pip: false
Build Environment Variables
Seed also has a couple of build environment variables that you can use to customize your build process. These should not be confused with the secret environment variables that are defined in the console.
$CI: Always set totrue. Represents the current environment is a CI environment.$SEED_STAGE_NAME: The name of the stage that is being built. The stage names are exactly as shown in the console.$SEED_STAGE_BRANCH: The name of the git branch the stage is auto-deployed from. If the stage is not auto-deployed, the value is not defined.$SEED_APP_NAME: The app name.$SEED_SERVICE_NAME: The name of the service.$SEED_SERVICE_PATH: The path of the service as set in the service’s settings. For example,/services/posts. If the service is at the root of the repo, this value is empty.$SEED_SERVICE_TYPE: Type of the serverless service. For SST services, the type issst. And for Serverless Framework services, it’ssls.$SEED_SERVICE_FULLPATH: The absolute path of the service inside the build container. For example,/tmp/seed/source/services/posts. If the service is at the root of the repo, it is/tmp/seed/source.$SEED_BUILD_ID: The build id.$SEED_BUILD_SERVICE_SHA: The commit SHA used to build a given service. For post-deploy phases, if the build is using multiple commits, the first commit will be set. If the service is being removed, it is set to the commit used in the last successfully deployed build.$SEED_BUILD_TRIGGER: Whether the build is triggered by “deploy”, “promote”, or “rollback”.$SEED_BRANCH: The Git branch used to trigger this build. Does not apply to promotions and rollbacks. For PR stages, this is the branch the PR was submitted to. Note the difference between this and the$SEED_STAGE_BRANCHvariable. These two variables will differ if you trigger a manual deployment using a branch that’s different from the one the stage is set to auto-deploy from.$SEED_PULL_REQUEST_NUMBER: For PR stages, this is the number of the Pull Request.$SEED_PULL_REQUEST_SOURCE_BRANCH: For PR stages, this is the name of the source branch.-
$SEED_PULL_REQUEST_TARGET_BRANCH: For PR stages, this is the name of the target branch. - Secrets: All your secrets in the Seed console are also made available during the build process. For example, a secret environment variable called TEST_VAR would be available as
$TEST_VARin the build process.
For example, let’s take a build URL in the console:
https://console.seed.run/jayair/serverless-app/stages/dev/builds/32/services/users
Here the $SEED_APP_NAME would be serverless-app, $SEED_STAGE_NAME would be dev, $SEED_SERVICE_NAME would be users, and $SEED_BUILD_ID would be 32.
Custom Build Environment Variables
Environment variables that are set in the build spec do not persist across commands. This means that in the following build spec, $MY_VAR will not be printed out.
before_compile:
  - export MY_VAR=hello
  - echo $MY_VAR
To ensure that your custom build environment variables persist across commands; Seed allows you to do something similar to CircleCI. You export your custom environment variables to a $BASH_ENV and Seed will load that on every command.
So a variation of the above with $BASH_ENV looks like this:
before_compile:
  - echo 'export MY_VAR=hello' >> $BASH_ENV && source $BASH_ENV
  - echo $MY_VAR
In this case $MY_VAR is loaded from $BASH_ENV and should be printed out correctly.
AWS CLI
The scripts in your build spec are run in an environment that are using your AWS IAM credentials. This means that you can directly use any AWS commands in your script using the AWS CLI without having to configure it.
Build Spec Examples
Here are a couple of examples of what you could do in a build spec.
Navigate to the service path
By default, the commands in the build spec are executed at the repo root. To change the working directory to the service, use the $SEED_SERVICE_FULLPATH environment variable.
after_deploy:
  - cd $SEED_SERVICE_FULLPATH && echo 'hello'
Run a script after deploy only in prod
Let’s assume your production stage is called prod.
after_deploy:
  - if [ $SEED_STAGE_NAME = "prod" ]; then echo 'deployed prod'; fi
Run a script after deploying a specific service
Let’s assume your service is called users.
after_deploy:
  - if [ $SEED_SERVICE_NAME = "users" ]; then echo 'deployed users'; fi
And if you wanted to combine two conditions you can do:
after_deploy:
  - if [ $SEED_STAGE_NAME = "prod" ] && [ $SEED_SERVICE_NAME != "users" ]; then echo 'deployed users to prod'; fi
Install PostgreSQL
If you need to start a PostgreSQL server locally for tests.
before_compile:
  - apt-get install wget ca-certificates -y
  - wget --quiet -O - https://www.postgresql.org/media/keys/ACCC4CF8.asc | apt-key add -
  - sh -c 'echo "deb http://apt.postgresql.org/pub/repos/apt/ `lsb_release -cs`-pgdg main" >> /etc/apt/sources.list.d/pgdg.list'
  - apt-get update
  - apt-get install postgresql postgresql-contrib -y
Invoke a Lambda Function
If you want to invoke a Lambda function as a part of your build process.
after_deploy:
  - >
    aws lambda invoke
    --function-name my-function
    --payload '{"name":"Bob"}'
    results.txt
  - cat results.txt
This works because the AWS CLI is available and configured with the IAM credentials of the stage.
Note that, we are not using the serverless invoke command here. This is because there is a known issue with Serverless Framework; the command hangs in CI environments.
Reference CloudFormation output
If you want to use a CloudFormation output from a different stack use the following.
before_compile:
  - echo "export MY_KEY=$(aws cloudformation describe-stacks --stack-name my-stack --query 'Stacks[0].Outputs[?OutputKey==`MY_KEY`].OutputValue | [0]' --output text)" >> $BASH_ENV
  - echo $MY_KEY
This’ll use the AWS CLI to get the information of my-stack; parse the output for the value of OutputKey MY_KEY; and then export the value as the $MY_KEY environment variable. Then you’ll be able to reference this value in your serverless.yml as ${env:MY_KEY}.
If you are trying to get the outputs for a stack that’s in a different region than the currently deployed stage, use the --region option in the AWS CLI.
Running Docker commands
You’ll need to enable Docker to use it in your build spec. Head over to our chapter on running Docker commands on how to do this.
Help improve this page. Edit it with GitHub
Was this page helpful? Let us know via Twitter
Do your Serverless deployments take too long? Incremental deploys in Seed can speed it up 100x!
Learn More